|
The unquestionable safe life of vinyl coated SS lifelines expired on many SJ23s some 30 years after manufacture. Surprised? Read on. CORROSION - The problem with vinyl coated SS wire is there is no way to gauge the quality or strength of the wire after the vinyl has cracked. Over the years the water intrusion will lead to corrosion. Consider that it took 30-40 years for industry and race committees to come to this conclusion. Their realization happened after several crew members each broke through their life line and died during various ocean races in the 2020s. As a result many ocean race committees now consider vinyl coated SS wire unsafe and no longer allow it. At a glance a person might judge the aging lifeline to be strong enough to keep them on deck, but a closer inspection will likely reveal many flaws. Granted a crew on a fresh water SJ23 is more likely to trip over a low lifeline than to break it but you should heed the advice of these committees. Just like the
service life of standing rigging in the southern US is ~10 years, so should a life line have a shorter life. Panache's 40 year old life lines in Canada had many cracks and were therefore due for replacement. Corrosion just takes longer in the north. Ah the impressions of guestimating (my SWAG).
- Dyneema does not corrode but has a definitive life when exposed to UV light. But it is a lot stronger and softer than SS making it ideal for a lifeline. WEAR - Then there is the wear of vinyl coated SS wire passing through the 3/8" hole in each stanchion. The wear looks ugly and the exposed wire has a nasty habit of snagging things. The vinyl coating and then the SS wire will wear at each post, especially if the line is left drooping so it can swing sideways with the hull. A lifeline should be tensioned to just snug, no more and no less. Hopefully the tube through the stanchion is smooth with slightly rounded corners at the ends, but don't count on it.
- Dyneema must be protected against chafe where it goes through a stanchion. This can take the form of lacing twine, a vinyl tube, or any other tough but smooth material.
AVAILABILITY - There are fewer companies manufacturing vinyl coated SS wire these days due to the lower demand and liability issues associated with corrosion.
SS Wire
- It is fair to mention that it is perfectly legit to replace the vinyl coated wire with bare stainless steel wire. Its just that the bare wire is thinner and therefore more likely to cut. Hopefully it doesn't create a meat hook for you!
Dyneema
- Today there is a suitable replacement in the form of Dyneema line. 6MM (1/4") Dyneema is perfect for an SJ23 and is available at most any chandler. It is slightly thicker than the factory SS wire and far exceeds the strength. The thicker Dyneema is softer and slightly easier to rest against.
SAFETY - It has been stated that a safety advantage for a Dyneema lifeline is the ability to cut it with a sharp knife. (That better be an extremely sharp knife). The idea being that opening the fore deck lifeline makes it easier to pull a casualty onboard with the line out of the way. It is next to impossible to pull a casualty through the 16" gap below the line.
- For the 3 times I have extracted a casualty from the water, it was always done this into the cockpit where the freeboard is lower and I can kneel closer to the water. All things to consider since I usually sail Panache solo.
Lifeline Net
- On Panache the bow portion of the lifeline is blocked permanently with a criss-cross of lines to keep a jib on deck. Lots of SJ23s are configured with netting like this. There is no way I can lower the forward line nor could I pull a person on board there. That leaves a cockpit gate as the only place to pull a casualty onboard. The freeboard is lower and I'd be more stable kneeling on the cockpit seat to pull the heavy casualty on board. There is a lot to be said for this.
Factory Configuration
-
The factory SJ23 life line configuration must be released with the single pelican hook at the transom. The entire lifeline would go slack as it droops lower. Doing so is handy only if there is an extra crew in the cockpit. Without that cockpit crew it is an instant justification to install a Dyneema lifeline that can be cut, albeit with a sharp knife.
Comfort
-
1/4" SS lifeline is painful to lean against for any length of time, less so with thicker Dyneema that can flatten somewhat with body pressure. However, even with Dyneema I wouldn't go without my tube cushions padding the cockpit gate lines.
Jib Chafe
- Dyneema is easier against the foot of the jib when sailing close hauled.
Flex
- Dyneema can fold easily when the tension is released. This makes it easier to tuck out of the way during winter layup where it must go straight up/down a stanchion so the winter cover can pack tight against the fixed stanchion and toe rail. It also makes it easier to clear the deck when a cockpit side gate is open. While I usually keep Panache's transom gate open, with Dyneema the pelican hook is clipped to the pushpit, leaving the soft line hanging below it. This takes less room and prevents gel coat damage.
Strength
- The Dyneema line will never break with full body weight flung against it. It is far more likely that the SJ23 stanchions will give. Just don't make it a practice to rely on a lifeline to keep yourself on board. So far this author has managed to stay dry, but I've come close!
Safety
- In thinking about lifelines on a pocket cruiser, the real strength comes from being attached at the ends; pulpit and pushpit/cockpit post. The stanchions between just keep the line from drooping. The short angle bracing at the bottom of a stanchion serves to offset the strain of being pulled inboard due to hull curvature.
- There is no way the stanchions can stop you from going overboard. That's my theory and I'm sticking to it.
____________________________________________________________________________________________
FABRICATION
- It is surprising how much line a locking Brummel eye splice takes. You discover this after you spliced the second eye and realize how much shorter it is than the length you cut. Some of the length can be recovered by stretching the line to remove the construction slack. After that the line length stays at the stretched length. Remember to account for this "shrinkage" when determining the location of the splice at the other end of the line. Failing that you may end up having to redo the splice a tad further down the line, which can best be done prior to tucking in the taper. It helps to have a good pusher fid. Fortunately I had enough extra tapered line tucked inside. Tucking the line inside definitely shortens the line >1-2". Remember to account for this.
Thimble
- Do include a SS thimble inside the eye as the larger radius maintains considerable strength. Add a whipping over the thimble to keep it in place.
Taper
- Remember to leave a long length of tapered line tucked inside. It maintains considerable strength.
Locking splice, single braid for the free end - https://www.youtube.com/watch?v=d0B6tYTVHVM
Locking splice, single braid for one end fixed - https://www.youtube.com/watch?v=4WW7Qvg3VjI
I started fabricating the new Dyneema lifelines for Panache incorporating some ideas from a friend's Catalina 27 shown below. After our discussion he was concerned enough to start replacement the next day. His conversion included some of his existing hardware to make the transition easier. My results for Panache are shown below.
CONVERSION TO DYNEEMA on a CATALINA 27. |
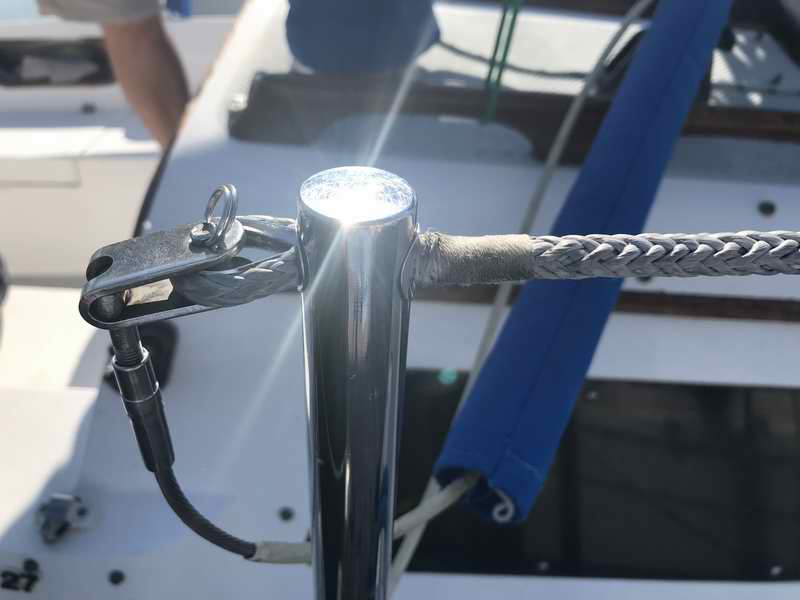
Fig 1, Cockpit Gate - The lifeline gate stanchion at the front of the cockpit. This stanchion is equipped with the all important SS tube through which the life line passes. It protects the lifeline from chafe. To add further protection we opted to add whipping line over the Dyneema. Note the SS thimble to prevent the line from slipping through the stanchion and to attach the gate line to. The gate will be converted to Dyneema over winter.
|
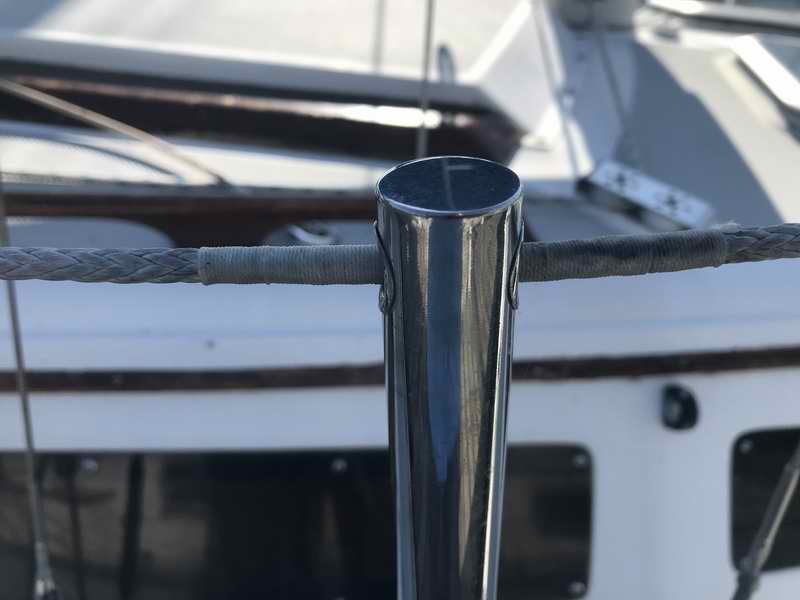
Fig 2, Mid Stanchion - This middle stanchion is also equipped with the all important SS tubing to minimize chafe. The Dyneema is double protected with none waxed whipping line that slides easier, leading to less chafe. |
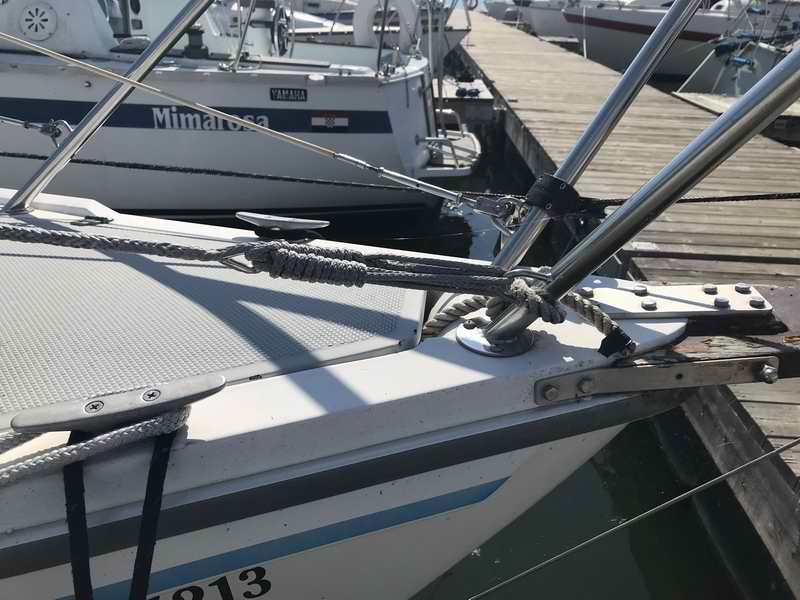
Fig 3, Pulpit - At the bow the owner opted to terminate the line with a spliced eye with SS thimble terminated by lashing to the pulpit instead of the previous turnbuckle. For comparison you can see the original SS line on the port side. The knot makes for convenient fabrication since the length is no longer critical. The lifeline of this Catalina doesn't come down for winter storage. But if it had to, it would only require releasing the lashing. On Panache I will also release the lashing since the lifeline must come down for the winter storage cover. |
UPDATED CONVERSION TO DYNEEMA on PANACHE, (2025)
I'm not about to take Panache through the Southern Ocean but our lake can have some very short peaky waves, especially at the choke point, making it dicey to walk the deck. Since Panache's life lines were showing wear I started the conversion in the winter with the final length and working ends to be completed in Spring.
Termination - It was always going to be a tad difficult to connect a pelican hook as elegant as a swaged fitting but it can be made functional with a spliced eye supported with SS thimble to be pinned to a turnbuckle toggle. Gate - Due to the narrow IOR designed SJ23 transom, the aft pointing cockpit pelican hook is at the limit of my reach from the dock finger. For this reason the gate line will be reversed with the pelican hook at the forward end of the cockpit. There it is within easy reach of the dock finger. Symmetry - Don't assume port & starboard lifelines to be the same length and don't assume the port and starboard stanchions are installed in the same place. Confirm lengths at your boat before you form the second eye. Construction Stretch - Remember to allow for construction stretch of the Dyneema. Stretch the Dyneema as much as you can before you terminate the second eye. However, if the completed line isn't long enough simply undo the splice and set a new one further down; that is if you left enough line tucked in for this. Failing this, adjust the length with your lashing at the bow. Protect the Dyneema - Insert a snug fitting vinyl tube through the stanchion hole to protect the Dyneema from burrs created by the SS wire. Also bevel the inside ends of the vinyl to protect the Dyneema from chafe. It wouldn't hurt to sand the hole smooth with 400 grit wet/dry sandpaper. Lashing - Use 1/8" Dyneema lashing to tension the lifelines, discarding the turnbuckles. It is difficult to splice Dyneema to the exact length to fit with a turnbuckle. Lashing line tied at the pulpit is easy to remove for winter storage. *Oh Damn* - Remember to thread the forward lifelines through the two middle stanchions BEFORE you splice the second eye. Boy that would be awkward.
|
STAINLESS STEEL (Previous) |
DYNEEMA (New) |
| Transom Gate - I seldom closed this gate since it blocks access to the outboard for starting or stopping it. Besides, I see no need to fall backwards! I do close it during rough weather though. I've used the ladder a few times and stepping through the open gate makes it easier to board.
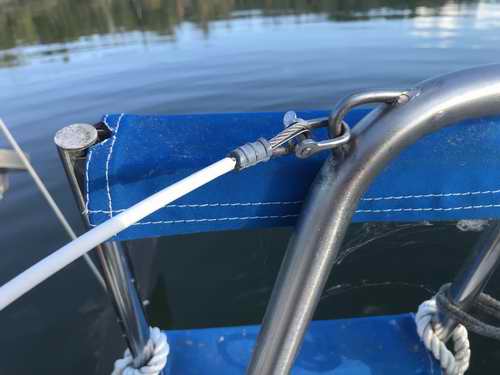
When I left the gate open the pelican hook hung at the end of stiff SS line, rubbing against the gel coat inside the cockpit. Not good. 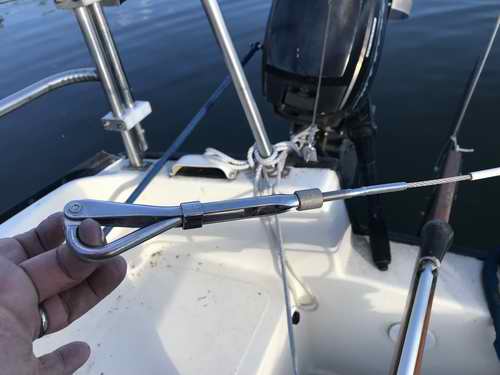
Transom Gate Parts (for Dyneema)
- Gate LOA = 33.5".
- 1 shackle.
- 42" of 6MM Dyneema = 26"+(2x8").
- 2 SS thimbles.
- 1 (RH) pelican hook e/w toggle.
|
Transom Gate - The spliced Dyneema eye is clipped to the port side of the pushpit with a shackle. The free end is fastened with a spliced eye & pinned to a pelican hook.
(RH screwed turnbuckle toggle). 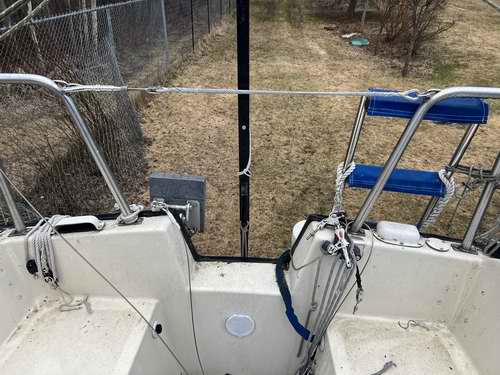
When the gate is open the pelican hook is now clipped on the port pushpit to protect the cockpit gel coat from chafe. 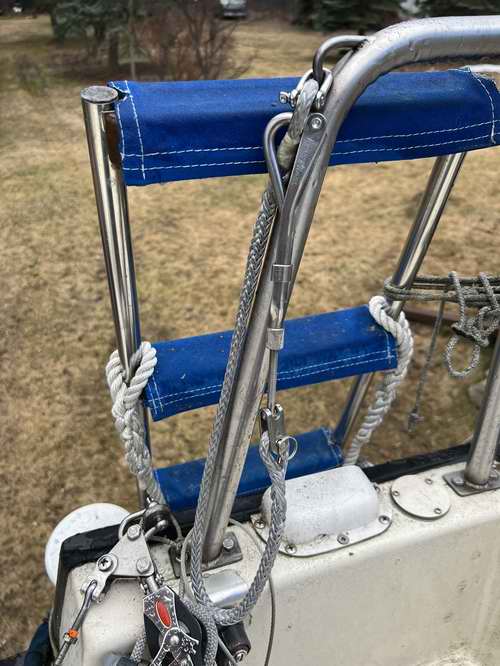
|
| Panache Cockpit Gate - This side gate is closed when sailing, making me feel all warm and fuzzy to know I'm not going overboard. When open it lays in the trough next to the toe rail. This gate line will be turned end for end.
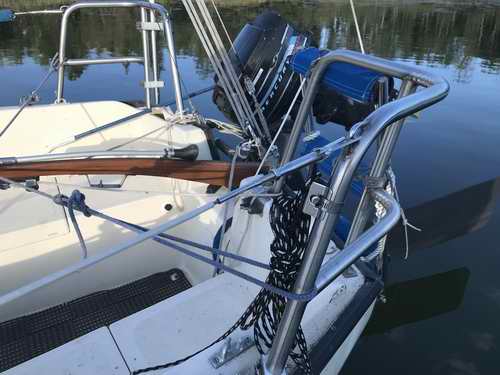
The cockpit gate and the forward SS lifelines were permanently attached to the stanchion at the front of the cockpit.
- Panache's forward lifeline is always permanently tensioned when on the water and released only for winter storage.
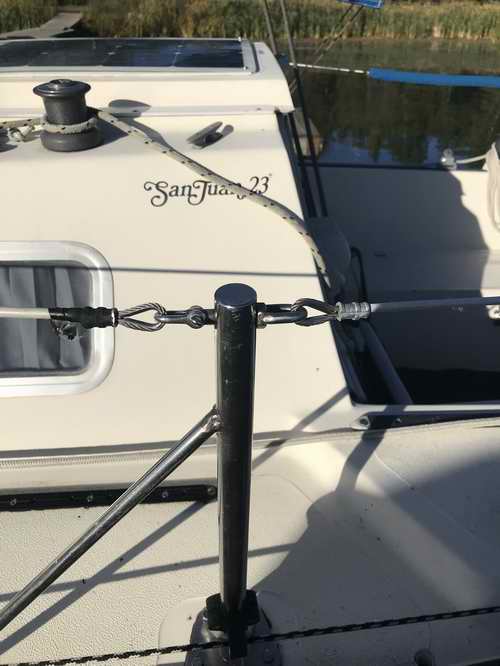
|
Panache Cockpit Gate - This gate is now turned end for end with the aft end attached to the pushpit using a spliced eye and shackle as shown below.
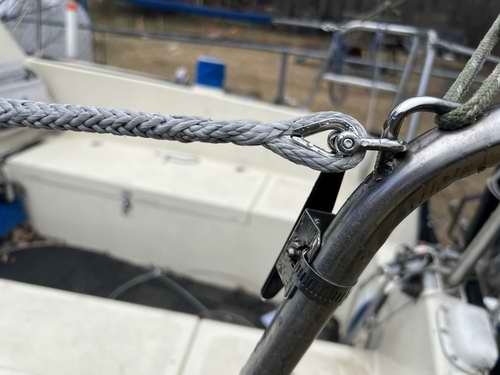
The pelican hook is now at the forward end of the gate clipped to the stanchion eye at the stanchion at the front of the cockpit. The Dyneema spliced eye is pinned to the turnbuckle toggle screwed (LH) into the pelican hook. 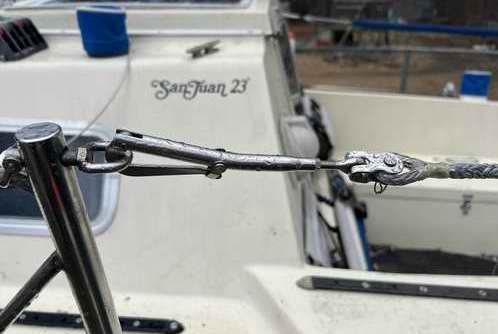
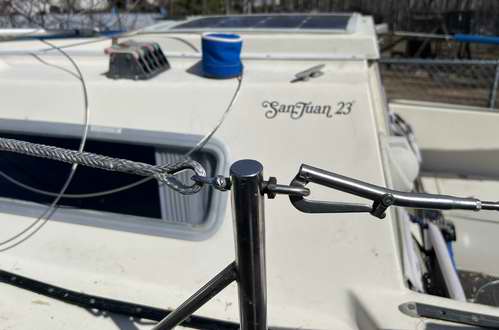
|
|
|
Cockpit Gate Parts (for port & starboard Dyneema)
- Gate LOA = 66.5".
- 2 shackles.
- 150" of 6MM Dyneema = (2x59") + (4x8").
- 2 SS eye thimbles.
- 2 (LH) pelican hooks.
- 2 toggles.
|
Stanchions - San Juan stanchions are hollow SS tubes with an open bottom through the foot. This means any water that enters can drain out and not split a tube when frozen. There is a tube welded inside the top hole to pass the lifeline through. The finished edge of the lifeline hole is sharp enough to eventually cut through the Dyneema. This is why I sanded the hole smooth, slightly bevelled the ends and inserted a vinyl sleeve to protect the Dyneema lifelines. I also bevelled the inside of the vinyl tube ends. If the vinyl deteriorates I will replace it with a split tube.
|
| Forward Stanchion - The SS lifeline always passed through this post with a split vinyl sleeve to protect the wire. Don't know when it disappeared! The lifeline also supported the net. 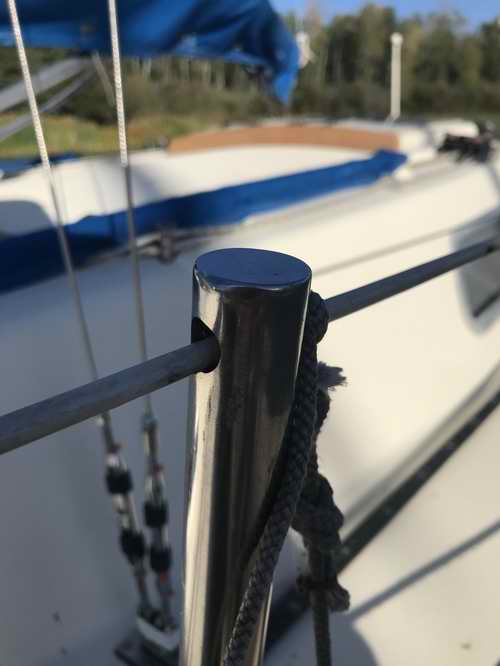
|
Forward Stanchion - The lifeline is pulled through a vinyl tube (ends bevelled inside) inserted through the mid stanchion. It also supports the lifeline net as before.
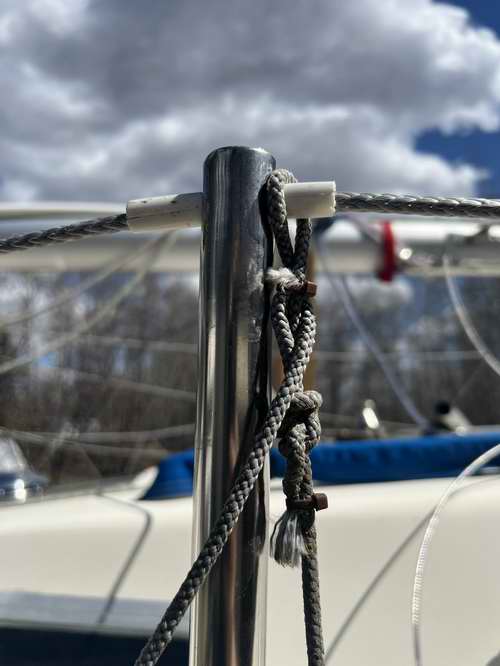
|
| Pulpit - These turnbuckles used to tension the SS lifelines. I always installed them with the circlip pointed outward to protect the jib.
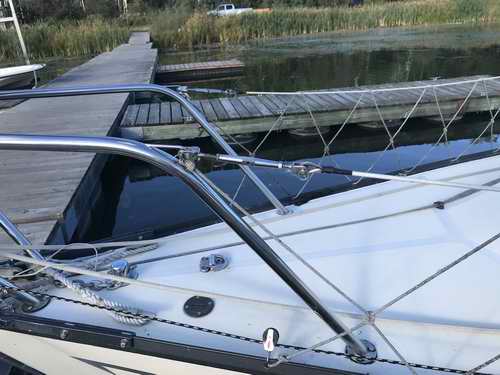
|
Pulpit - The length of this lifeline was determined on the boat. It is fastened with Dyneema lashing between the pulpit and a SS eye spliced in the lifeline.
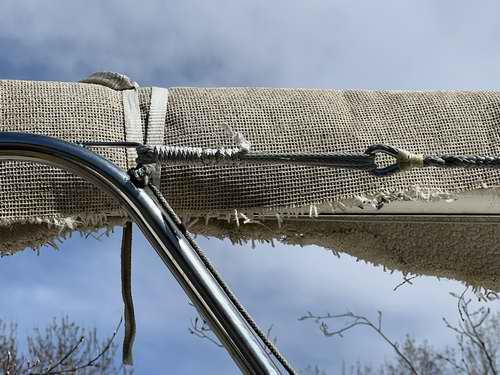
|
| |
Forward Lifeline Parts (for port & starboard)
- Lifeline LOA = ~102".
- 2 shackles.
- 244" of 6MM Dyneema = (2x102")+(4x10").
- 3M of 3MM Dyneema = 2(1.5M) of Lashing line.
- 4 SS thimbles.
- Two 3/8" vinyl inserts.
|
Total Parts - 10 SS 6MM thimbles, ~40' of 6MM (1/4") Dyneema line, 3 pelican hooks, 5 shackles.
|
If Dyneema isn't your cup of tea you could install solid stainless steel railing. Now that is something to experience.
|