| SJ23 Tech Tip E12, (2022-07-07) Bob Schimmel. | |||
|
Install a Tiller Autopilot -
Lashed Tiller or
Wind Vane. |
|||
|
Imagine you are sailing single handed and you have to attend an urgent "meeting" at the head! Wearing your foul weather gear would probably make this a worst case scenario but what are you going to do, considering that you don't have automatic steering and it's pretty difficult to ignore this "meeting"! You could hove to, which is probably the calmest motion to hold a "meeting," no pun intended. There are other less daunting but equally important tasks like adjusting a whisker pole or retrieve that "dear child" you lashed in the pulpit. Then there are those important trips to the galley to maintain your body and soul or to actually check the chart. While hove to has the advantage that other boats can easily manoeuvre around you, wouldn't it be nice to stay on course while you leave the tiller? The safety and convenience of it all is sheer decadence, especially if you are passage making when distance and time are so important. Think of all the things you can do while "Otto" is steering. You could actually arrive relaxed, with all your boat jobs done! Now there's a novel thought. VARIOUS AUTOPILOTS -
NOTE: One of the limitations with the original model
Autohelm or the later version Tiller Pilot is that they react too slow in
a rough sea state, especially downwind. The slow adjust rate is
perfectly fine when motoring but too slow when sailing in deep waves
or gusty winds when larger steering angles are required to maintain a
straight course. It is extremely hard on the gears, the motor and the current draw when the control rod is pushed to the end of its travel. I have seen a unit
that stripped its gears trying to maintain a course in these
conditions.
"I have it on good advice from the
factory that a
Tiller Pilot cannot
maintain a course sailing in heavy wind. It is beyond the limits
of the hardware to do this." For this reason several sailors I know only use their unit when
motoring, changing sails or to relieve the helm for a short time while
they are preoccupied with an urgent bio task. Other than this, they
secure the helm with a Tiller Tamer or steer manually. As a result
their low end unit doesn't wear out and it is available when they
really need it, motoring into a harbour or for a long transit.
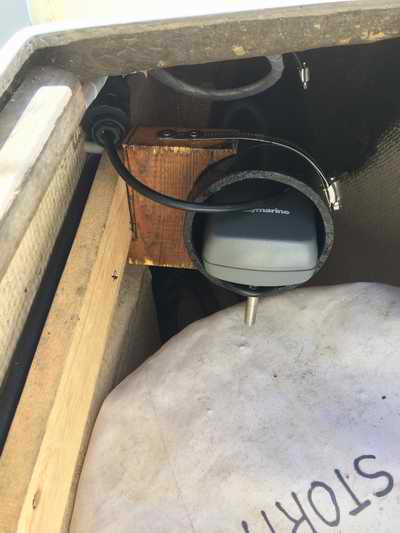
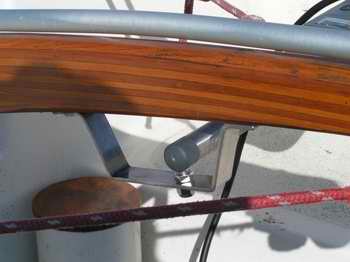
My cockpit mounting hardware consists of a removable wood block shown here. It may be less elegant than the factory option but it is strong enough to stand on and leaves the cockpit wall flat when removed. The water proof screw mounting hole fits flush to the backrest to prevent snagging things. The 3" SS screw through the wood block is held captive so I can't loose it. After many years of leaving the mounting hole open I now keep a screw in it to keep it clean. All of this due to a spider that decided to make a nest in there. Unfortunately for the spider, I decided that I can make better use of this hole! Good riddance. I rejected the factory cockpit mounting hardware for two reasons:
The cockpit electrical connector for the Tiller pilot was installed in the foot well below the Tiller Pilot where it is easy to extend the boat wiring harness to. It is fairly easy to line up the key pin to plug the cable in and the backrest is unobstructed, as is the port hatch when the Tiller Pilot is in place. Replacement Bulkhead Connector - Order here. The factory direction controls on Panache's Tiller Pilot are labeled for a starboard installation and therefore backwards for a port installation. For straightforward logic to steer by I affixed direction labels (arrows) on the case to indicate port or starboard without having to think through the + & - logic.
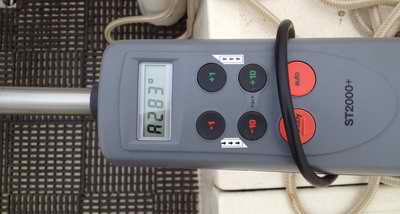
ELECTRICAL WIRING - The Raymarine ST1000+
or
ST2000+ Tiller Pilots
are capable of being controlled
by an external NMEA 0183 compatible device (GPS navigation receiver, plotter, etc) to follow a programmed route over the
ground. This is superior than using the "hold this heading" switch
when operating the boat through a cross current or cross wind. To this end I installed a
voice grade (Cat 3) wiring harness from the cockpit connector to the
GPS. The harness
runs inside a cable tray along the top inside of the port locker, through the port cabin bulkhead (sealed with sealant), and across
the cabin behind the companionway to a terminal
strip below the VHF. This
where it is cross connected to the
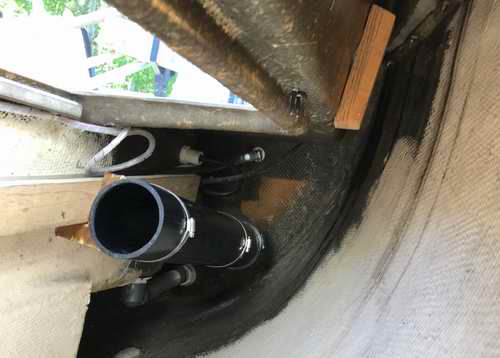
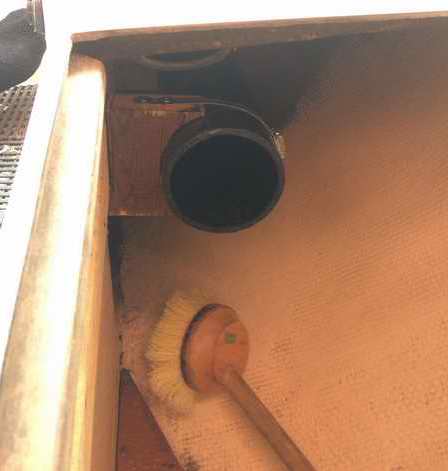
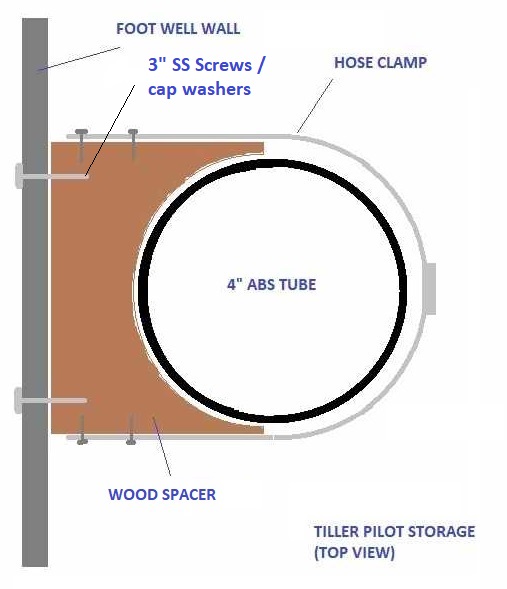
STORAGE - For many years I stored my Tiller Pilot behind a settee back rest, wrapped in a towel & protected from the weather. The spot is that dry and secure so I was reluctant to store it elsewhere. But, retrieving it took too long when sailing solo and Panache was sometimes well on her way to a new heading by the time I returned to the cockpit. "I hate it when the jib is back winded." So the Tiller Pilot was moved to new storage in the cockpit locker which is in keeping with my philosophy of, "Store it where you use it." It's now stored inside a 22" long 4' ABS tube mounted inside the port locker, against the foot well wall. This install is easier said than done, given the tight confines of the locker. The ABS tube is mounted at a slope (aft end lower) to drain water out. The open end at the front just protrudes into the aft end of the locker opening where it can't interfere with removing the false floor below it (See Tech Tip D02). The two wood spacers that support the tube are not shaped quite as perfect as shown at right but you get the idea. For my installation they required a bit of finagling to make them fit over the cable tray I previously installed (Tech Tip D02) along the top of the locker. The spacers are coated with epoxy to seal the wood. The oversize SS hose clamps were split in the middle, cut to length and double screwed to the spacers for maximum holding power. The tube is long enough that the Tiller Pilot will slide in fully. The back end of the tube is stuffed with high density foam padding with a hole in the middle to receive the actuating rod. A cap is not required on the front and neither is soft fabric to line the tube for chafe protection.
It took a considerable amount of planning and contortion to install this storage tube on my own since I had to install it over the cable tray. After crawling into the locker with the assembled unit, I positioned it against the wall and drew an outline of each foot print, with screw hole marks inside each. Using a tiny bit I drilled four holes from the inside through to the cockpit. The next part got even trickier. While straddling the locker wall to hold the unit in place, I drilled (from cockpit side) back into the feet to create pilot holes for the 3" long mounting screws. The front top screw went in first which gave me a reference pivot point for drilling the back screw holes. You have to get creative when you work on your own. It helps to have a right angle electric screw driver. The Tiller Pilot slips real easy into the holder. Note where the connector lays to eliminate strain. It never moves. I even found a spot down there to store the wood pedestal socket that the Tiller Pilot operates from. Everything is extremely convenient to access. I like modification this a lot. NOTE - Use this locker for electronic storage only if it is bone dry. If it is wet, corrosion will likely ruin the unit.
LONG TERM USAGE - Time has shown that the Raymarine ST1000 and ST2000 Tiller Pilots can experience internal corrosion due to water intrusion. Consider the situation where the unit is stored or operated in warm air and is then exposed to cold rain. This quickly lowers the temperature of the case, drawing moisture in through the perimeter or piston seals. You might want to operate the unit in a water proof bag to ensure it stays dry. |
|||
|
Return to Tech Tip Index. . . . . . . . . . . . . . . Have a Question? |
|||
 After
experiencing the performance of an Autohelm 300 (now Raymarine
ST1000+) on another SJ23, I bought a Raymarine ST2000+ (ST
= Seatalk) for
Panache. It has a more robust drive that should
relate to longer life. The slightly higher power consumption is
insignificant with two solar panels supplying power. It also adjusts twice as quick which relates to a straighter course.
However, it is usually over powered by large waves or a wake. After a
20KM delivery trip it is wonderful
to arrive at the dock with all my chores done and the
boat ready for haul out. I don't mind steering, but I hate being a slave to the tiller
on such a long delivery trip in near freezing weather. So far the ST2000+ has performed well under sail
in light air. I've added
direction arrows to the key pad so I push the
correct switch to steer the boat since it is installed on the port
side (internal steering logic reversed). The only problem I've had
is that some display segments stopped working. That was remedied by adding some foam to the
perimeter of the display to push the case down uniformly against the circuit board for complete contact. I would love to have a wind vane equipped with
NMEA output
to sail by. If you have ever experienced sailing to a vane you
know how nice this can be." Bob Schimmel
After
experiencing the performance of an Autohelm 300 (now Raymarine
ST1000+) on another SJ23, I bought a Raymarine ST2000+ (ST
= Seatalk) for
Panache. It has a more robust drive that should
relate to longer life. The slightly higher power consumption is
insignificant with two solar panels supplying power. It also adjusts twice as quick which relates to a straighter course.
However, it is usually over powered by large waves or a wake. After a
20KM delivery trip it is wonderful
to arrive at the dock with all my chores done and the
boat ready for haul out. I don't mind steering, but I hate being a slave to the tiller
on such a long delivery trip in near freezing weather. So far the ST2000+ has performed well under sail
in light air. I've added
direction arrows to the key pad so I push the
correct switch to steer the boat since it is installed on the port
side (internal steering logic reversed). The only problem I've had
is that some display segments stopped working. That was remedied by adding some foam to the
perimeter of the display to push the case down uniformly against the circuit board for complete contact. I would love to have a wind vane equipped with
NMEA output
to sail by. If you have ever experienced sailing to a vane you
know how nice this can be." Bob Schimmel 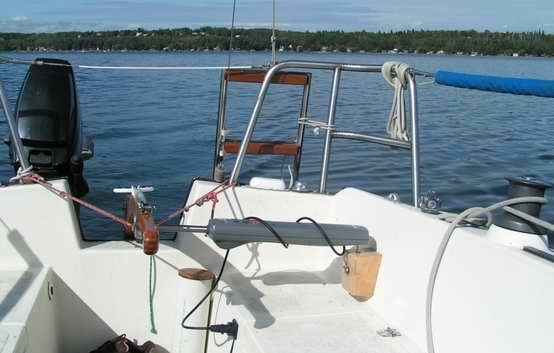
 GPS to
operate using NMEA sentences. See
GPS to
operate using NMEA sentences. See