| Most sailors will stay in protected water or at the dock during lousy
weather claiming they don't have decent reefing on the mainsail.
Staying put is OK until you get caught out there having to deal with what Mother nature hands out to you. Being able to reef the mainsail quickly is
sort of important when the weather turns nasty!
This is a time for acting, not thinking. Reef early and reef often is a fundamental safety procedure. I'm always impressed that Panache goes just as fast reefed and with more control.
The factory
reefing configuration works OK but a crew has to go to the mast to set the first reef tack cringle on the
ram's horn hook and then pull the clew line in. The problem with
this system is that the mainsail has to be dropped out of its track. The trip to the
mast must be coordinated with the
helmsman. Reefing is usually easier with crew on board but I wouldn't count on
them if they are green horns. You can only watch anxious crew dance around on the coach roof
for so long, entertaining as they may be, before you have to do
something and quick! Sailing in heavy weather
can humble a crew and sailing solo usually adds a
few twists that you may not have thought of. Staying within the safety
of the cockpit helps to avoid risks, which means the reefing lines must
be extended to the cockpit. This demands that the system be well
engineered and the process well thought through, unless
you enjoy entertaining as well! To determine which reefing system
you want on your boat you have to decide where you want to control the
lines lead to; cockpit, mid boom or mast.
Described here are two typical cockpit lead mainsail reefing systems that can be
installed on an SJ23. There are variations of these that tend to
be complicated but I
prefer a simple and functional system. If you are unsure which one to choose,
try using the system on a similar boat. That way you can
experience the pros and cons before you spend your hard earned
cash or perforate your boom with unnecessary holes. The biggest hurdle to
overcome is not pulling in the reef, but releasing it. That is why
some people opt to keep the free ends of the reefing lines on the boom.
It has the least internal resistance, is the
cheapest to install but requires you to crawl to the mast to adjust the
lines. I prefer to stay in the cockpit when I'm sailing solo which
is why I lead the lines to the cockpit. Having installed and used the single line
system I can tell you that the dual line system works way better, which is why I mention
it first.
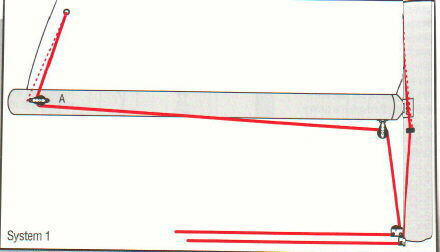
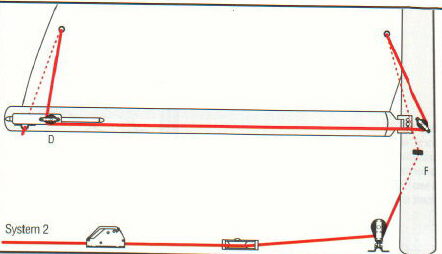
DUAL LINE REEFING SYSTEM, (Separate
Tack and Clew Lines for each Reef Point) - The
biggest advantages of a dual line system is that it has the least
internal friction and the tack and clew lines can be
controlled independently, making it easier to use than the single line system. The
dual line system is
depicted
below, mainsail hoisted on the left
and reefed on the right. For the sake of simplicity the lines for the second reef are
not shown but they are shown in bottom of the table below. The clew block (marked A on the boom)
is positioned so the reef line intersects the strain (reefed sail) at
about 450.
If the position of the SJ23 boom on the mast is fixed then the tack eyelet should be positioned
on the mast, a few inches below the bottom of the boom. This intersects the strain at about
600 (reefed
sail) with most of the force being upward along the luff. The tack cringle will slide across the tack
reef line when the boom swings, therefore it is OK to leave a bit of slack when the
tack line is set.
A
perfectly packed, efficient sail isn't required for a reef since there is too much wind
anyway. However, you should flatten the sail with foot tension as much as possible to
reduce lift.
If you want to slide the SJ23 boom down the mast in heavy weather then the tack
line fairleads must
be installed on the boom instead of the mast. In this case you will have to mount the
fairleads
as far forward on the boom as possible. This configuration isn't
that conducive to efficient reefing. I far prefer the boom to be
fixed with the fairleads mounted on the mast. Your choice.
The lines of each reef should be
colour coded to
differentiate between reef 1 & 2. Its a "good" thing to pull the correct
one, the first! For the same reason the rope clutches or
cleats should be labelled
(tack 1 / clew 1). Of less significance is the colour
of the mid tie down lines on the mainsail.
CUNNINGHAM LINE - This mainsail flattening line is not shown in the drawing above because the drawing would become too
cluttered. The cunningham cringle is about 6" above the
tack. Look closely and you'll see it. There are several ways to pull
this cringle down to flatten the mainsail. You could run a permanent line through it similar to a tack reefing line.
I prefer to slip a stainless tack hook (with line attached) through the
cunningham cringle then pull it down and secure it around a cleat on the
mast. This
extra tension
flattens (depowers) the mainsail to match higher wind speed. It is a useful
technique for racing where a tenths of a knot may allow you to sail faster.
When
cruising I seldom bother with the cunningham unless the wind blows not
quite hard enough to reef.
The cunningham should be used in conjunction with matching outhaul tension to depower the main.
I do like to sail as fast as possible. TACK LINES - As mentioned above you have to determine if the tack lines
on your boat are to be attached to
the mast (shown on diagram) or to the boom. Regardless of which location, the dead end of a tack line is tied to an eye
strap on one side, passes up through its
respective cringle and down the opposite side through an eye strap and finally down to the
turning blocks at the base of the mast if you want to terminate the line
in the cockpit. Since the majority of the sail cloth is bundled on
top of the boom it is important to keep the lines away from the cloth so
they slide freely. This is why many people prefer to install the
tack lines on the mast instead of the boom. I transferred Panache's
lines from the boom to the mast for the same reason.
Line length
Tech Tip F03. CLEW LINES
- The dead end of each clew line is tied to the pin on the turning block
installed on the boom. From there it goes under the boom
and up to its respective
clew cringle, then back down through the same turning block on the boom. This balances the load on this turning block
and creates a 2:1 mechanical advantage for pulling sail cloth. With
the reefing line under the boom it also transfers some of the load to the boom. Since
there is limited space to install two turning blocks on the same side of
the boom, the block for the second reef is installed on
the opposite side. The clew lines then go forward to turning blocks
mounted on the front of the boom at the goose neck.
This greatly
reduces the internal friction of the clew line since it can align with
the direction of the pull to the deck block as the boom swings.
Line length
Tech Tip F03.
I hope this explains the rational
behind the dual line reefing system. Each tack and clew line terminates
in its respective rope clutch installed back at the cockpit. The
alternative is to install it on the boom. Your choice.
|
HISTORY - In 2014 I replaced my single line reef system with a dual line system experimenting with some old 1/4" polyester line. My single line system didn't work. Once the tack cringle was down
to the boom I couldn't pull the clew down due to too much
friction in the system.
An SJ23 has very narrow deck space to
install
reefing lines
lead back to the cockpit so the
design is very particular. I did a trial installation
of my dual line system using the single line blocks and discovered it worked way
better than the single line. The first time I demonstrated the trial system I set
and released both reefs in five minutes; would have been quicker if I didn't have to
explain! Click here
for a description of how the system works. Later I installed separate blocks and
rope clutches for each line as shown in
the photos below. Line length
is described in
Tech Tip F03.
By 2019
my polyester reefing lines were getting old and difficult to release.
Ironically releasing a reef
quickly is the test of a good system so it was time to replace the lines.
This time I chose 1/4" (6MM) line, green for reef 1 &
red for reef 2 to match the
green and red
rope clutches. While it is
tempting to use 1/8" slippery single braid Dyneema line, it would just be my luck
that I would slice my wet hands open when pulling it. So I
installed 1/4" (6MM)
Dyneema which is
the minimum size a person should handle
without wearing sail gloves. See
Tech Tip F03. Dyneema doesn't exhibit torque loading, making it perfect for all the right angle turns a reefing line has to go through. When shaking out a reef I
usually hoist the mainsail with the winch to pull the Dyneema
lines through the deck hardware. Sometimes the internal load is too much and pull the slack to the mast prior to hoisting the mainsail.
Unfortunately the 1/4" (6MM) Dyneema line with the slippery jacket creeps
slightly through Panache's
rope clutches so
I thickened the line where it is gripped.
Where to bulk up the line and for how long was determined with the mast
standing to make an accurate measurement. Splicing a piece of 1/8" line inside
another line is a clever technique
that creates
tapered ends that easily slide through a block. I spliced it using a 1' length of coat hanger wire, a wrap of fibreglass tape,
some coconut oil for a washable lubricant, and then
zigzag stitched through both
to make them as "one." The result is
smooth operation, minimal wear and when the thick portion is in the
line clutch you know the sail cringle is down
correctly.
https://www.berkeleypoint.com/learning/singlebraid.html.
There are two alternatives:
-
Slip a braided jacket (sleeve) over the line and whip the ends to create
a smooth transition for sliding through the blocks. Then zigzag
stitch through it to make it as "one" with the core.
-
Replace or adjust the cam in the rope clutch to handle a thinner line.
NOTE - In my tests of using 1/8" Dyneema line to reef the mainsail I determined that it griped well in
a dual or single cam cleat and around a rough finished deck cleat. What a surprise since this small size line is the most difficult to grip. It failed miserably over a polished cleat as I could easily pull
3 wraps of line off that cleat.
|
PORT DECK LINES |
STARBOARD DECK LINES
|
|
* For the perspective of standing in the cockpit, looking forward up to the mainsail
*
view these photos from the bottom
to top of this table
|
|
2019 - Below are the photos of
Panache's deck mounted reefing hardware using 6MM Dyneema line
e/w a polyester jacket so they can be gripped by the Easylock rope clutches at the cockpit.
2022 - I moved the free end of the boom vang line to the starboard rope clutch.
NOTE 1 - By convention the mainsail halyards terminate on the starboard side and the jib halyards terminate on the port side. Panache's lines were installed opposite by a previous owner and it was too difficult to switch them. I've gotten used to it. NOTE 2 - Directing the reefing lines to the cockpit loads up the strain on the gooseneck. Make sure it is in good condition. See Tech Tip F20. The alternative is to install cleats or rope clutches on the mast or boom. But then you must go to the mast to reef.
|
|

Fig 22 - Overall view of port lines.
|
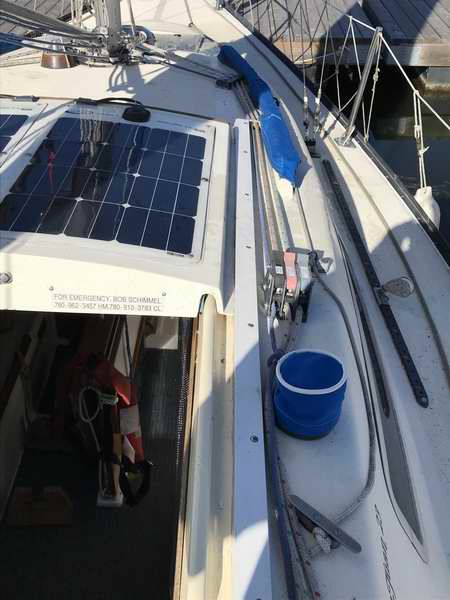
Fig 23 - Overall view of starboard lines. UPDATE PHOTO
|
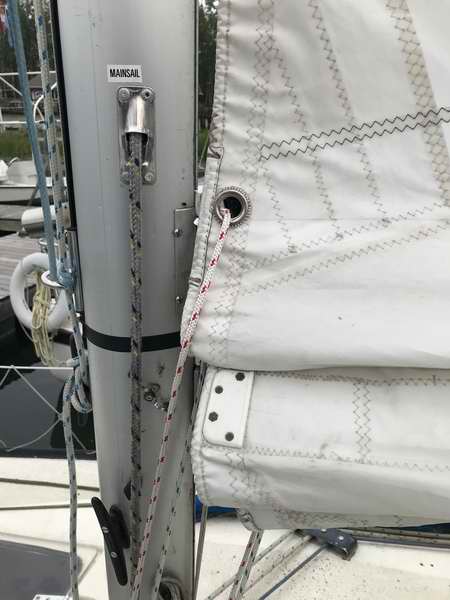 Fig 20 - Tack for 2nd reef set.
|
 Fig 21 - Clew for 2nd reef set.
|
|
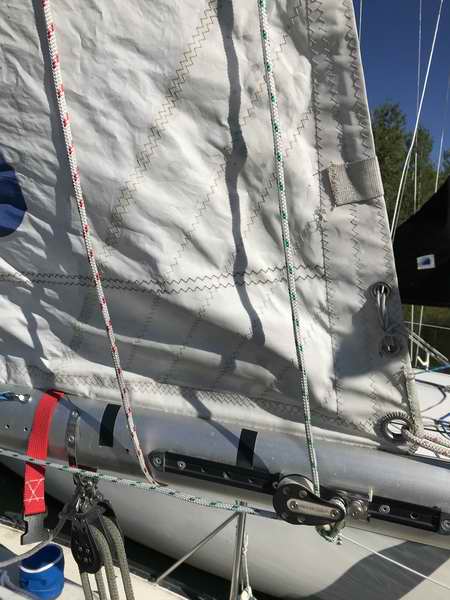
Fig 18 -
Port clew fitting for 1st reef.
|
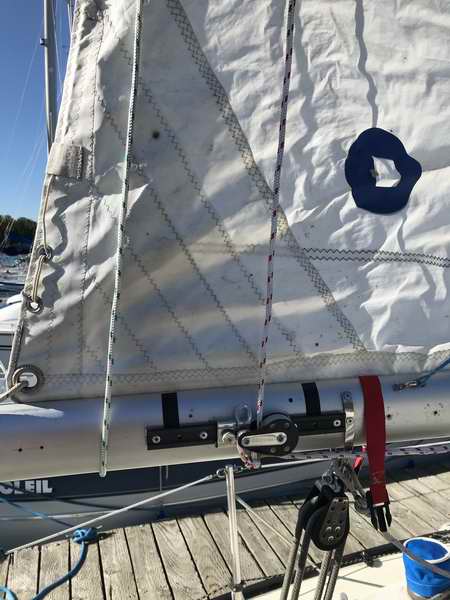
Fig 19 - Starboard clew fitting for 2nd reef.
|
|
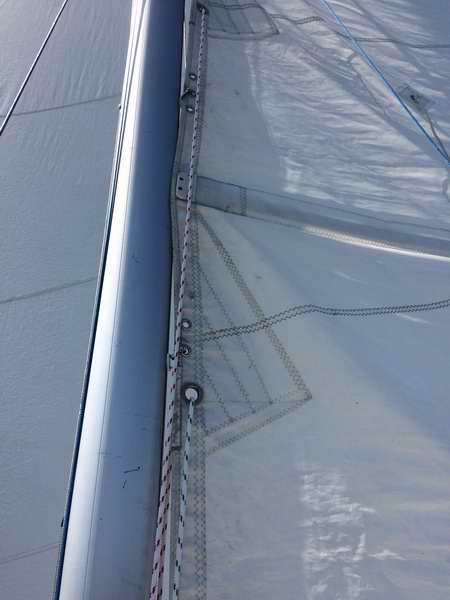
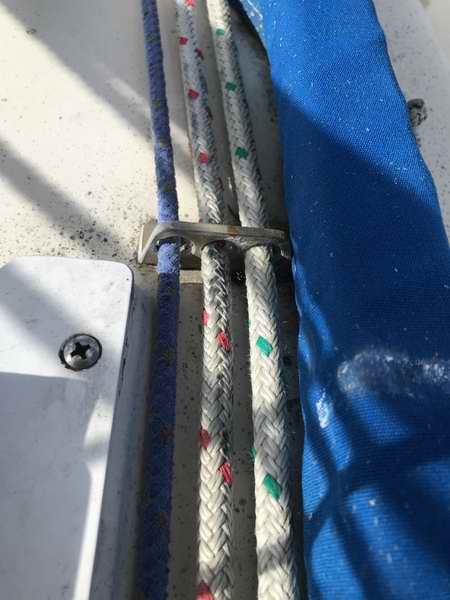
Figs 16 - Port tack cringle for 1st reef. The reef lines through the tack cringles are tucked in behind the mast where it is out of the air flow.
|
Figs 17 - Starboard tack cringle for 1st reef is tucked in behind the mast where it is out of the air flow.
|
|
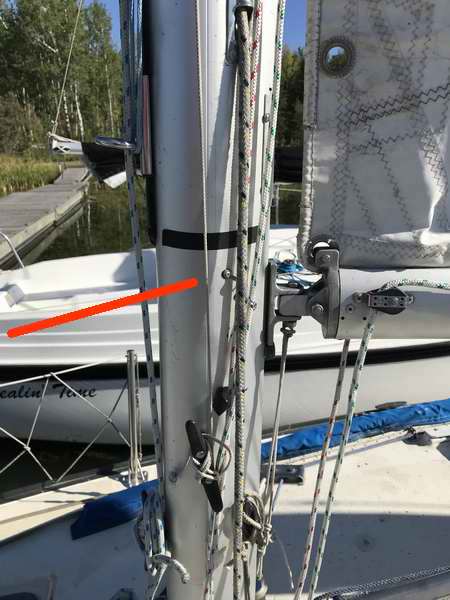
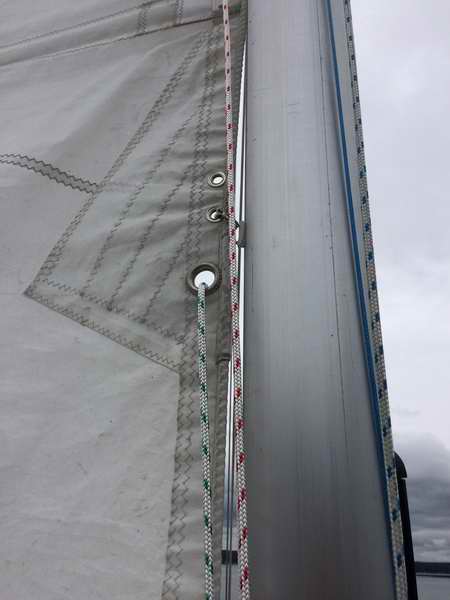
Fig14 - The port eye straps are level with the goose neck to set the correct angle when the tack cringles are down on the boom.
|
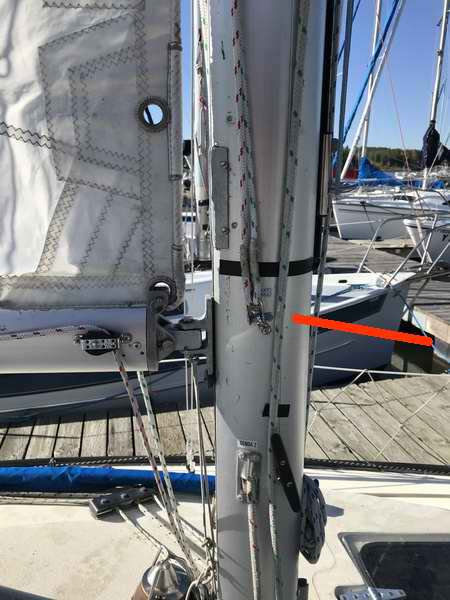
Fig 15 - The starboard eye strap is level with gooseneck. The 2 tack lines are quick to release & stored on the boom when mast is stepped. UPDATE PHOTO
|
|
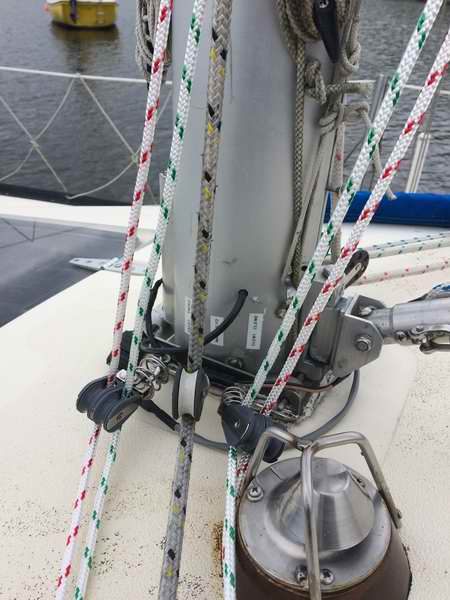
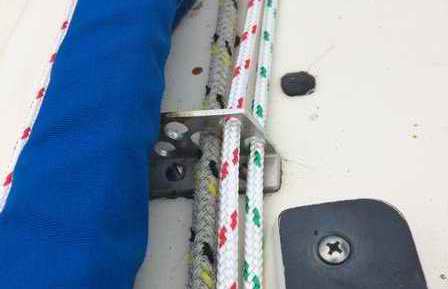
Figs 12 - The tack and clew reefing lines run over separate blocks at the mast base to
minimize friction. All blocks are spring loaded to keep them aligned for minimal friction. The foot of the mast is labelled to identify which line goes through each block when the mast is stepped.
|
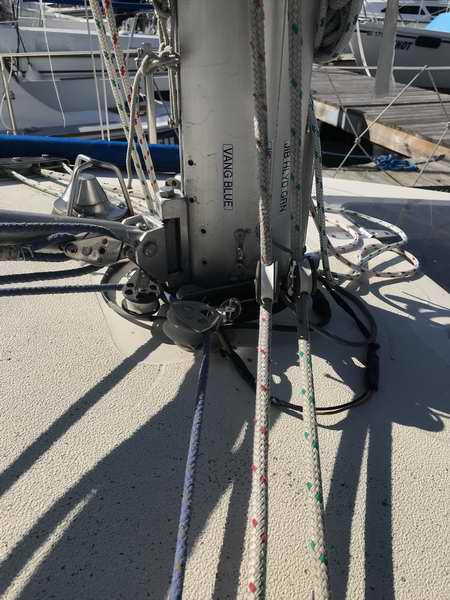
Figs 13 - The tack and clew reefing lines run over separate blocks at the mast base to
minimize friction. All blocks are spring loaded to keep them aligned for minimal friction. The foot of the mast is labelled to identify which line goes through each block when the mast is stepped. UPDATE PHOTO
|
|
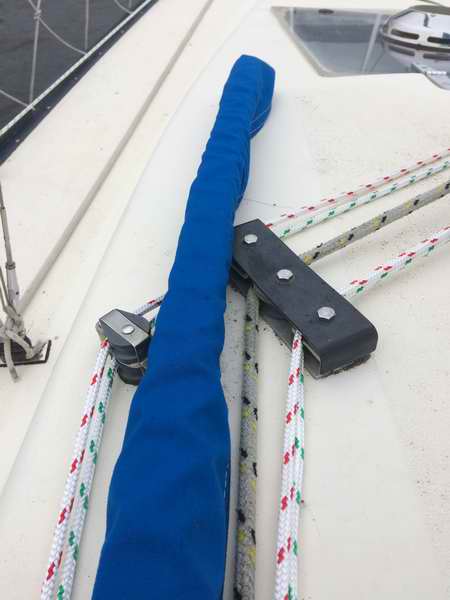
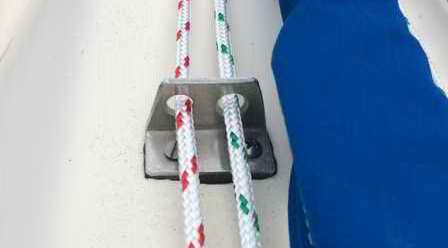
Fig 10 - Each
mounting hole for deck hardware is sealed with epoxy and the foot print is sealed with butyl rubber.
|
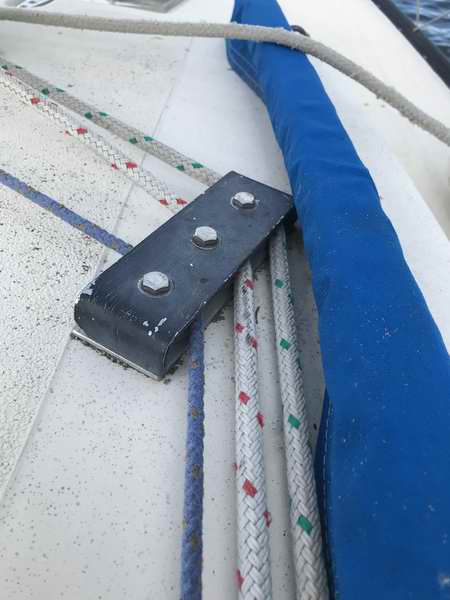
Fig 11 - This inside sheave will be doubled, same as Fig 10, to accommodate a future boom topping lift. UPDATE PHOTO
|
|
|
|
Figs 7-9 -
Deck
fairleads organize lines around the hand rails and to protect the gel coat from abrasion.
|
|

Fig 5 - The 2 rope clutches are bolted together as a unit to make for a neat, strong installation. The cross pins are secured with a 3/16" E-clip at each end. The mounting holes are sealed with epoxy and the foot is sealed to the deck with butyl rubber. Love those Lewmar winches with dual pawls.
|

Fig 6 - UPDATE To terminate the boom topping lift at the cockpit, an extra rope clutch was bolted to the existing triple using (4 x 1/4)" bolts. A turning block was bolted on top of the deck organizer. A matching block was clipped to the foot of the mast. A swivel block was hung on the gooseneck using a soft shackle. Some modifications are temporary for 2026. UPDATE PHOTO
|
|
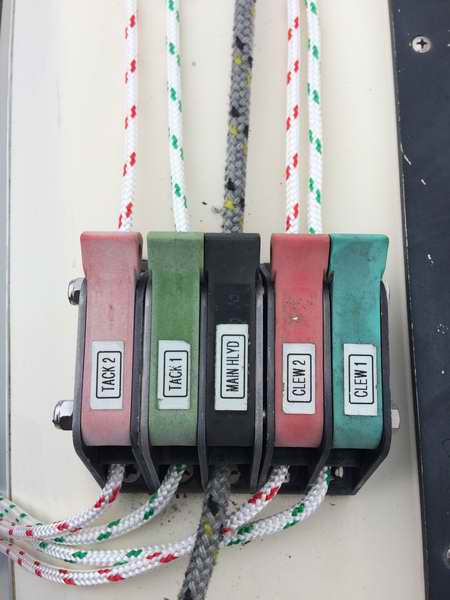
Fig 3 -
The black Easylock rope clutch is for the main halyard and
divides the tack lines on the left from the clew lines on the
right.
To make sense of this arrangement, the
green clutches are for reef 1 & the
red clutches are for reef 2. With this configuration I simultaneously pull
both tack lines and then both clew lines so
reef 1 comes down while keeping
reef
2 lines snug. It is important to pull the clew 2 line with clew 1 so it doesn't
snarl around the end of the boom. However, it is usually easy to pull clew 2 in later when pointed upwind.
HINT
- A really easy way to "push" a line through a rope clutch is to use a
fid.
|
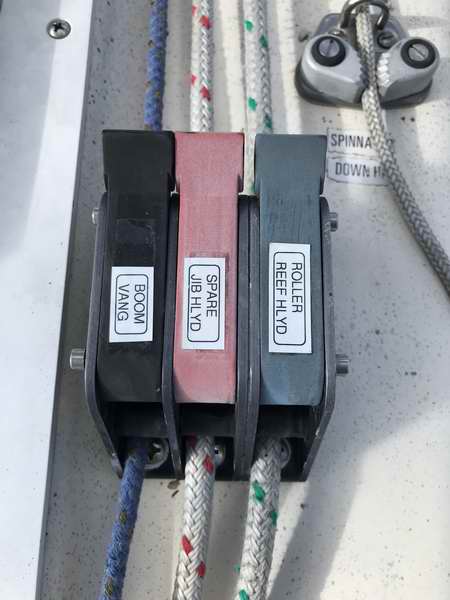
Fig 4 - The control line for the boom vang line is located in the cockpit where it is convenient to control and easy to see the effect it has on the mainsail shape. Far superior than reaching forward under the vang where the mainsail is out of sight.
- The spare red halyard is coiled at the top of the halyard bag for quick deployment.
- The green halyard is normally tensioned at ~50 pounds and coiled at the bottom of the halyard bag.
- The halyard bag is oh so comfortable to lean against. UPDATE PHOTO |
|
Fig 1 - This is a sketch of how
reef 1 (lower) and
reef 2 (upper) lines should be run on a
SJ23 using separate tack and clew lines.
In Panache's installation each reef point is 3' deep and parallel to the boom.
The
reef 2 line is usually omitted from many diagrams but for the sake of
clarity
I've shown both here.
Somehow the gurus expect you to figure this out! Having said that, the
lines on the port side of the sails are omitted since
including them challenges the drawing of my software. However, it is shown in
the Harken diagrams above. So there you go, guess I'm just as guilty.
NOTE - Tack and clew lines are shown above deck for the ease
of drawing.
|
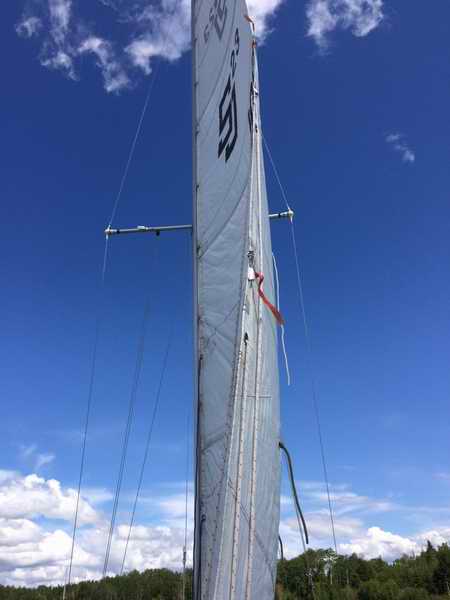
Fig 2 -
What a
sweet shape to the mainsail. It shows how the reef lines stay
close to the sail cloth for minimal drag. There is a bit of slack in the
reefing lines so they don't pull on the cringles to affect the sail shape.
|
|
PORT DECK LINES |
STARBOARD DECK LINES
|
REEFING PROCEDURE - Usual reefing
procedure for Panache's 2 lines system is as follows:
- Snug up the boom
topping lift, having previously attached it due to worsening
weather. (You do check the horizon every
now and then don't you?). Panache has a mechanical boom vang but I still snug up the topping lift as a backup.
- Release
the mainsheet to let the boom feather in the wind. This relieves the stress
on the cloth, slugs and lines. Maintain speed with the jib.
-
Lower the mainsail with the
tack reefing lines while letting the main halyard
slide through your hand, working one against the other to maintain a
bit of luff tension.
Stop when the tack cringle reaches the boom or the mark on the
halyard reaches the rope clutch.
- Pull
the second reef line along with the first to minimize the chance of a snag!
- With the tack cringle
just above the boom, cleat the reefing line and
tension the halyard hard. You will need a flat mainsail.
- Pull
the clew reefing line till the cringle is lowered to the boom and
adjust the tension along the foot to flatten
the sail then lock the rope clutch.
- Pull
the second reef line along with the first to minimize the chance of a snag!
- If you expect to sail for
a long time
in heavy weather, roll up the loose cloth and tie the intermediate lines to gather the cloth.
If you tie around the boom, leave the lines slightly loose so as not to strain the cringles. This may flatten the foot a bit which should create an easier motion
through the water with more speed. Not all mainsails are equipped with these lines or require them.
You could also tie short lines around the boom and through the tack and clew cringles to remove some strain from the reefing lines.
-
If you haven't done so, now is the time to pull
in the second reef lines before they snag.
- If the weather worsens
set the second reef on top of the first, repeating steps
2 to 6.
- If
you want to set a third reef on your SJ23 (I
don't envy your weather situation) use loose lines with reefing hooks
on the end to pull down the
third set of tack and clew cringles. Best to set these in
place right after you set the second reef and sail to the first hiding hole you can find.
- Very few SJ23s have
a third set of cringles. While reefing hooks may be difficult to set on a rolling deck,
installing a
third set of permanent reefing lines will clutter up
the mainsail for the majority of use during lighter
winds. Trade offs again.
- As
the weather improves, shake each reef out by releasing the reefing
lines and pulling the halyard
up to tension the luff. Maintain headway
with the jib
to keep the boat moving in a comfortable motion through the lumpy
water.
Here are some extra tips you might find useful.
- Support the boom with the topping lift to prevent stretching
the leech while the mainsail is reefed. The support could prevent a tear in the mainsail. This is something I
usually do on Panache with the first reef and always do with the second reef due to
the 8x1 mechanical advantage of my mainsheet.
- Keep a reefing hook handy in case a line wears through. Panache has 2 reefing hooks hanging in the companionway ready for use. Each one has a 4' long 1/4" line spliced to it,
- I abandoned the
single line system described below because it has too much internal
friction with lines through the cringles. I was never been able to set a reef properly and
always had to hike to the mast to pull the reefing lines. I averaged
15 minutes to set a reef, a bit less to release one. Enough
said, I think the single line system sucks!
SEASON START -
Each clew line is tied to the block pin at the end of
the end of boom. From there the lines go under the boom, up to the cringle, down to the block and forward to the blocks at the end of the boom, down to the deck turning blocks, to end at the rope clutches on the deck.
Each tack line has a loop spliced at the mast end and secured
at the eye strap on the mast with a shackle. It then goes through the mainsail cringles
to end at
the rope clutches on deck.
WINTER STORAGE - At haul out time I will pull the clew and tack reef lines out of the deck blocks and bundle
them under
the mainsail straps on the boom. The intention is to keep the reef lines with the boom
during winter. I store my full batten mainsail on the boom over
winter, wrapped in the mainsail cover with straps relaxed. The
load is spread over several cushions to make it easy on things.
At launch time I unbundle the reef lines from the boom and run them
through the deck blocks to the rope clutches. Straight forward organization.
_______________________________________________
 SINGLE
LINE REEFING SYSTEM, (One
loooooong clew
to tack to cockpit
line) - A
single reefing line is simpler to install but more difficult to
operate on a pocket cruiser due to lots of internal friction if the line is lead back to the cockpit.
It is likely OK if the line is lead to the mast. When a reef is set you end up with lots of line in the cockpit, which can be a nuisance
but doable if you stuff it in a bag.
The first reef should be a different colour than the second reef and the
rope clutch
should be labelled to eliminate confusion when the hull is heeling too
much. The problem with
this system is
the
internal friction through the cringles, blocks, and against the sail cloth
bundled on the boom. I was never able to pull all the reef line to
fully lower the sail to the boom. It always required a trip to the mast to
fiddle with the lines or tuck cloth in. Just the trip I was trying to
avoid. SINGLE
LINE REEFING SYSTEM, (One
loooooong clew
to tack to cockpit
line) - A
single reefing line is simpler to install but more difficult to
operate on a pocket cruiser due to lots of internal friction if the line is lead back to the cockpit.
It is likely OK if the line is lead to the mast. When a reef is set you end up with lots of line in the cockpit, which can be a nuisance
but doable if you stuff it in a bag.
The first reef should be a different colour than the second reef and the
rope clutch
should be labelled to eliminate confusion when the hull is heeling too
much. The problem with
this system is
the
internal friction through the cringles, blocks, and against the sail cloth
bundled on the boom. I was never able to pull all the reef line to
fully lower the sail to the boom. It always required a trip to the mast to
fiddle with the lines or tuck cloth in. Just the trip I was trying to
avoid.
If setting a reef line is difficult then releasing a reef is even more
difficult, to the point of being dangerous because it takes so long. Usually I climbed to the boom to pull the reef line out through the
cringles and free up the line jammed against the cloth and inside the blocks. There
was a
better than excellent chance that the loose line has snagged on something
which is really frustrating.
On some boats it is impossible to achieve
proper luff and foot tension using a single line. I think a single
line reefing system will work OK on a smaller sail or one with lighter cloth but not on
an SJ23. I wouldn't recommend it.
The usual reefing
procedure for a single line system is as follows:
- Release
the mainsheet and let it feather in the wind to relieve the stress
on the cloth and lines. Maintain some speed with the jib.
- Snug up the boom
topping lift, having previously attached it with the worsening
weather. (You do check the horizon every
now and then?).
If you trust your mechanical boom vang you may
dispense with this step.
- Pull the
mainsail down with the reefing line while letting the halyard slide through your
hand.
Work one line against the other to maintain some luff tension.
It really helps to mark the lines so you know where to stop.
- When the tack cringle is pulled down to the boom, cleat the reefing line.
- To
lower the clew to the boom you will have to pull the reef
line by hand and pull the extra line through the tack cringle and cleat the line.
I find that I can seldom flatten the sail sufficiently for the
higher wind
speed.
- Tension the
halyard to flatten the luff.
- If you expect to sail for
a long time
in heavy weather, tie the intermediate lines around the boom to flatten
the foot and distribute the strain.
It also helps to pack in the excess cloth. Not all mainsails are
equipped with these lines or require them. This is one job that
you have to climb on the cabin roof for. It cannot be done from
the cockpit but the boat will have easier motion with a reef set in.
- Pull
in the second reef lines to remove the slack and eliminate the
possibility of a snag.
- If the weather worsens
further set the second reef on top of the first. Repeat steps
2 to 7. This time it will be next to impossible to pull the
line past the bundled first reef. I have always had to do this
in the marina before I set out into rough weather.
- As
the weather improves, shake each reef out by pulling the halyard
against the reef lines to maintain luff tension. Maintain headway
to keep the boat moving in a comfortable motion through the lumpy
water. (This is when you
have to watch for motion sickness).
___________________________________________
There are many variations of these two systems. Some
sailors will dispense with leading the lines to the cockpit, preferring to
terminate
them on the front of the boom or on the mast. While this system
works well, it necessitates going to the mast which may be difficult
in rough water if you sail solo. In this case you better have
a tiller tamer, auto pilot or be very quick! Years ago I used this technique on
my previous boat but usually delayed the trip to the mast hoping that
the wind would subside. It almost never did!
Yet another system involves terminating the tack and clew lines at the
center of the boom. Positioned here it is possible to reef the
mainsail while standing in the relative safety of the companionway or sitting
on the coach roof. As appealing as this may seem, the boom must be hauled inboard over the
cabin to reach it which could create excess heeling when sailing upwind.
If you have an Olympic gymnast on board this is merely a challenge!
If you want to add a second "set of hands" for reefing, install some lazy
jacks. See
Tech Tip F22 for Lazy Jacks.
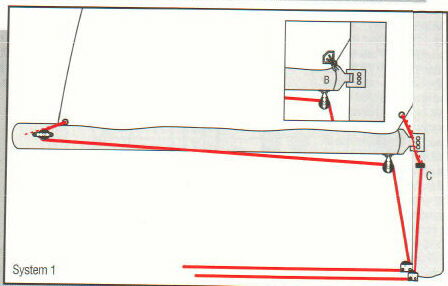
NOTE: I borrowed the diagrams from the nice folks at Harken.
|