|
A-FRAME
CONSTRUCTION (1999)
- Fabricate your A-frame in the sequence listed here
to minimize your chances of making an error:
-
Cut the poles to length, ~101". (This length means the A-frame lays inside the forestay). See POLES.
-
Attach the top half of the foot hinge
to the bottom of each pole. See FOOT HINGE.
-
Bolt each hinge plate to it's T-extrusion.
-
Screw the T-extrusion on
it's mating foot pad while the pad is aligned to the toe rail.
-
Cross the pole ends to form the apex and
drill a common hole through both poles using a single long bit to make the hinge. See APEX HINGE.
By
following these steps you eliminate complex measuring that
will likely be off by several degrees resulting in a misaligned hinge that
will bind or can't pivot. The chances of you measuring it correct are minimal because this is not XYZ 900 dimensional construction!
Remember, Murphy!
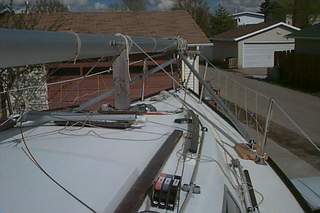 POLES
-
The 2" OD aluminum poles of Panache's A-frame have 1/4" thick
wall. This thickness is overkill to the Nth degree but the price was right. 1/8"
thick wall is sufficient, similar to a
spinnaker pole or electrical conduit. See COMMENT below.
The distance from the pivot bolt at
the foot to the hinge bolt at the apex is 99" with ~1"
of pole extending beyond the hinge bolt. With the A-frame laying on the deck, the apex fits just short of the forestay
fitting, leaving room to transfer the forestay from the A-frame
to the deck fitting. 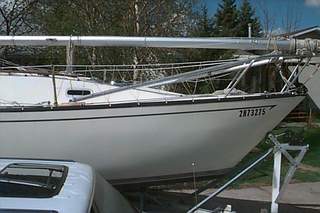 If you decide to make your poles longer, keep in mind that the apex must not block the stem fitting to attach the forestay. It is prudent to attach the forestay to the
fitting quickly to secure the mast
and protect the safety of the people standing in the drop zone.
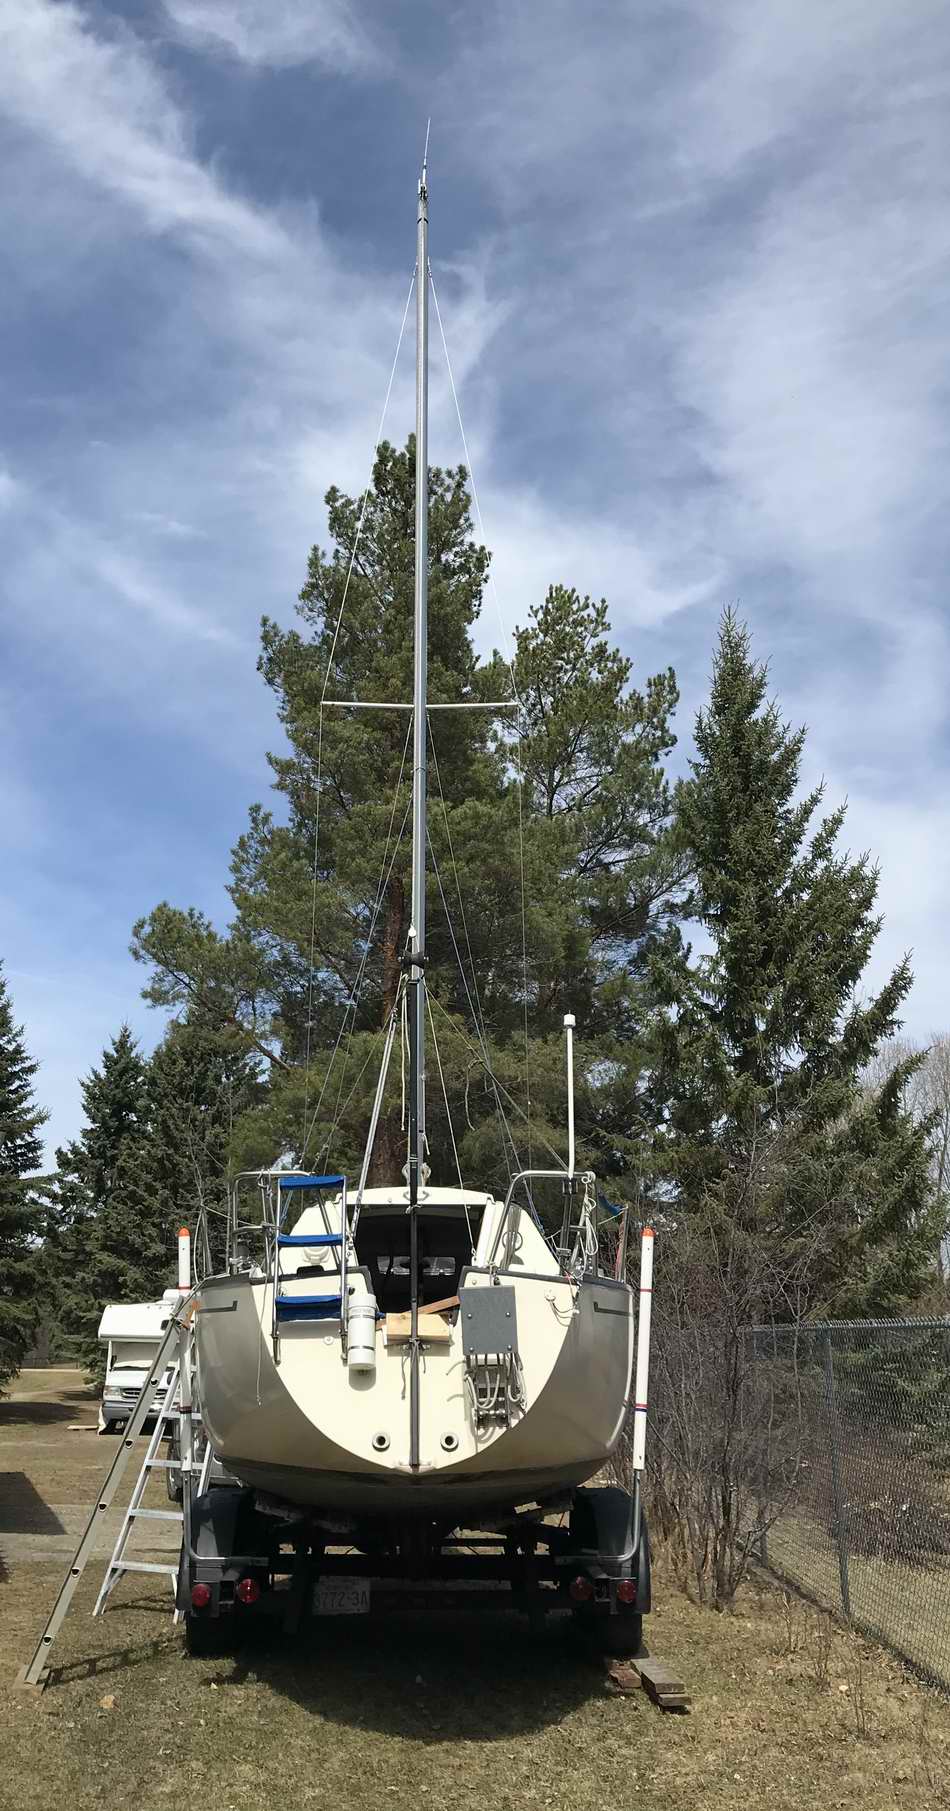
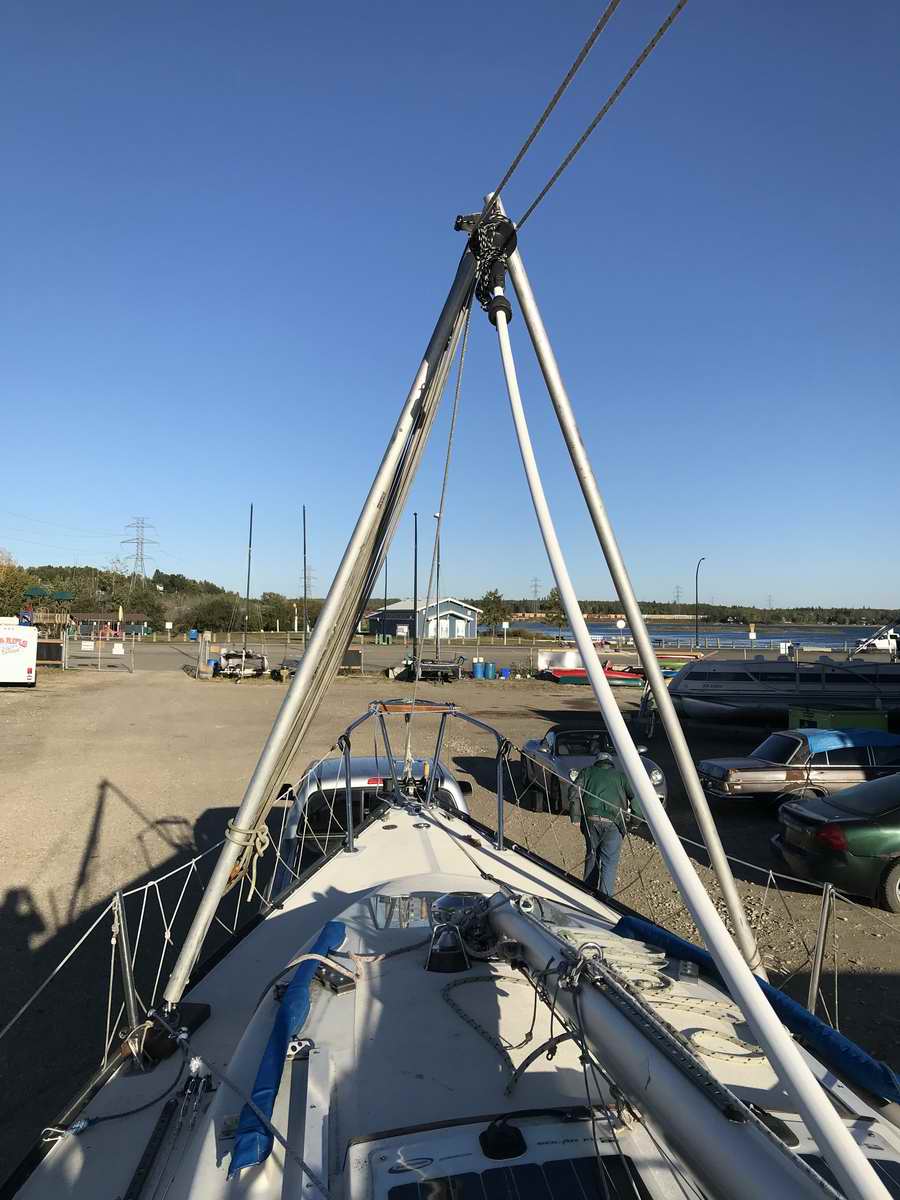
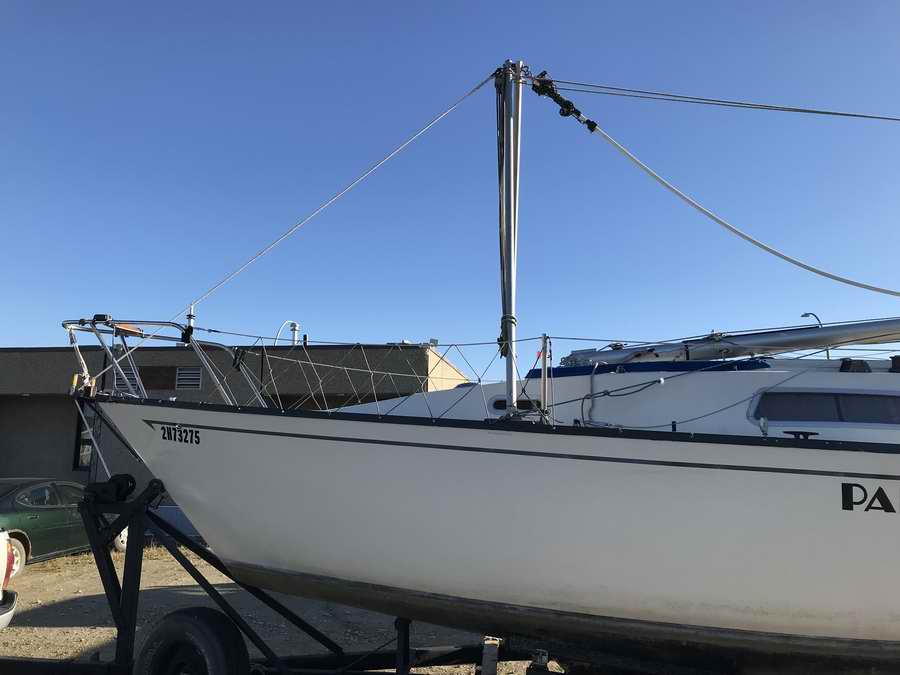
It is also convenient to leave the A-frame on deck for road travel or
winter storage, as seen in these two photos.
If you want to fabricate an A-frame for a larger sailboat, scale the
dimensions up proportionally. The length of the poles should be
from the mast step to the forestay fitting. The pole diameter and
wall thickness should be equivalent (or bigger) to a spinnaker pole
designed for your boat. If the assembly is too long then consider
two shorter poles joined with a sleeve. This would allow you to
store the
A-frame in a
small space. This is a great way to go if you are a road warrior sailor
who wants to be independent of shore services.
COMMENT: "When I designed this A-frame in 1999 I had no idea how much force I
could be dealing with
so I erred on the side of safety by using heavy gauge aluminum. After using this A-frame on
sail boats as long as 30', I realize I overbuilt the assembly for an SJ23. I now
know that lighter poles are quite
OK since the load is all compression.
In
fact, I have seen poles made from 3/4" conduit, although 1.5" would be
better as it is less apt to collapse under load.
Conduit or light gauge aluminum poles would be easier to carry. I have also seen poles made from 1.5" spruce tree trunks,
gnarled 2" poplar trees and fir 2x4"s. If you intend to
use engineered wood then choose clear, straight grain poles.
It would be relatively simple to cut a notch in the end of the wood pole
to insert the hinge plate and fasten a hose clamp over
the end to reinforce it. Saturate the pole ends with
epoxy for strength and coat the wood with Sikkens Cetol to protect it from the elements.
Another method is to slip 6" long 1/8" thick metal tube over the
pole end. Flatten the protruding tube, bending it to align with the T-extrusion on the foot pad to form the
foot hinge. Be your own judge in this design. I have this habit of
building
everything to withstand "WWIII". I hate flimsy Mickey Mouse stuff.
No offence Walt!" Bob S. TOP
|
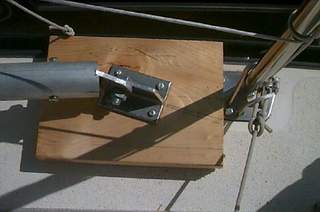 2, FOOT HINGE & DECK PADS
- You can make a fully articulating hinge (using a pneumatic rod end fitting) so the
poles always align to the deck or you can make a simple nut/bolt hinge that aligns to the plane the poles pivot
on. I built the latter design
because I had the material and was in a bit of a
hurry to launch.
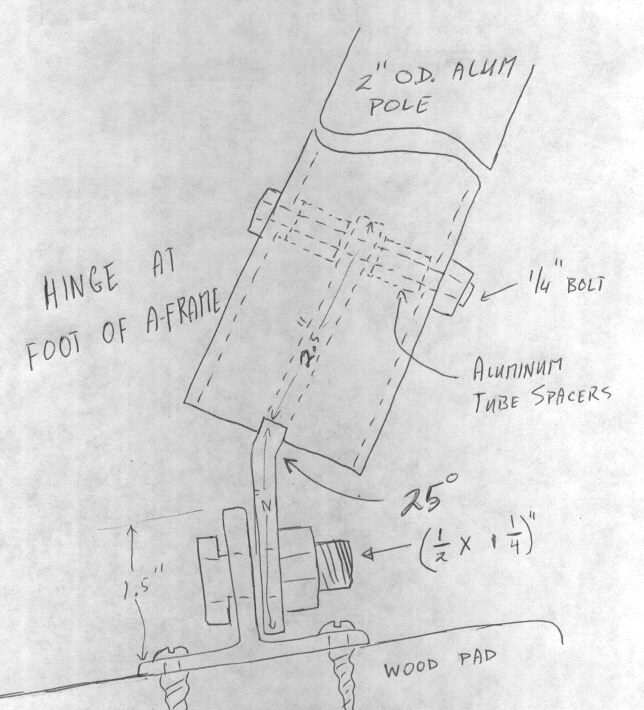
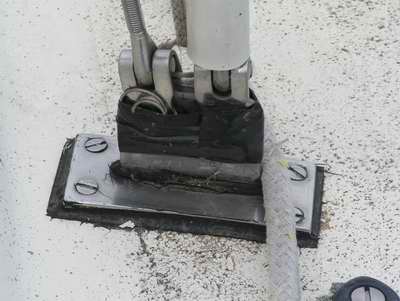
The top half of the hinge plate consists of a 1/4" thick
aluminum flat plate fitted inside the bottom of a pole fastened with a 3/8" bolt with two centering spacers. The spacers are short sections of aluminum tube cut from a ski pole. (profile diagram of hinge assembly). Notice the two
notches cut into the pole to fit the flat plate into. The spacers and notches hold the plate
firmly along the center line of the pole.
The plate is bent 250
to align with the aluminum T-extrusion (bottom plate of hinge) on the deck pad. The T-extrusions must lie parallel to the center line of the hull (the turning axis of the hinge) so the frame can pivot preferably a full 1350. At
the hinge location, draw an imaginary line across the deck and another
one over the hinge, fore & aft, parallel to the center line.
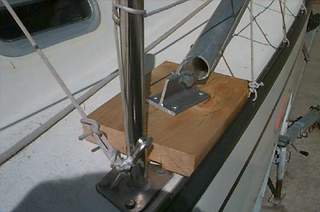 This
is your pivot point and axis of rotation. The
curvature of the deck can fool you when taking measurements. Be
careful. (If you
use a full articulating ball joint here, you can dispense with all of this critical alignment
as the hinge would pivot freely regardless of the
angle of the poles. Aviation type ball joints are not cheap but they work very well.
The aircraft industry and farm implements use them extensively for perfect alignment of
control arms).
The hole in the hinge plate is drilled slightly forward of center so the A-frame can lay flat on
the fore deck. The two deck pads are made of (2x8)" spruce to protect
the gel-coat and are coated with tung
oil to prevent rot.
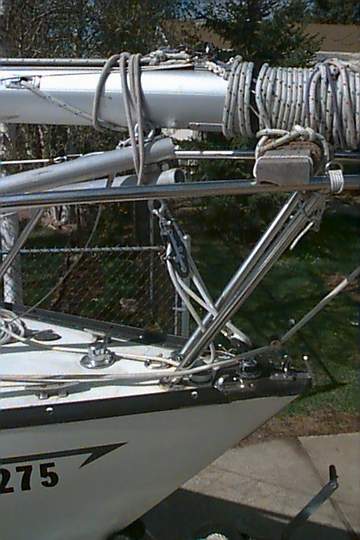 The 3" long aluminum T-extrusions are screwed to
the center of each
deck pad. Thus the hinge operates freely through the
full 1350 arc that the frame must operate. With the deck pad wedged against the toe rail and tied to the stanchion, the pad doesn't move. All of this may sound complicated, as it takes a bit of finagling to bend the hinge plates just right, but both hinges must turn freely. Take your time with this part of the job. Patience has its rewards!
Once the A-frame is placed on deck, mark the bottoms of the poles with a felt pen as starboard and port for the next time you hoist the mast. It may not be obvious now but you'll thank me later for this tid bit of advice!
3, APEX HINGE -
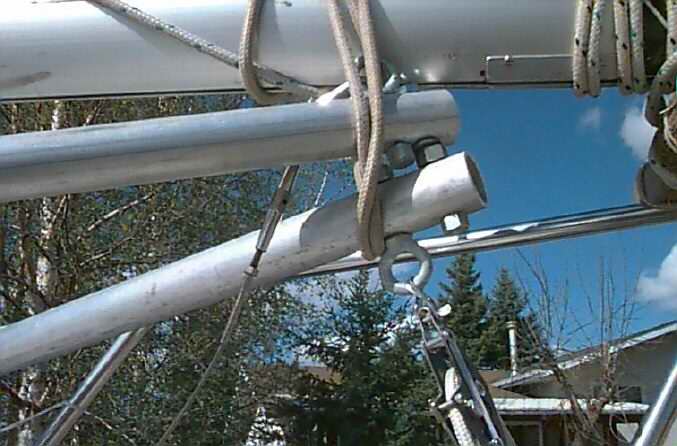
The simplest way to create a strong hinge at the
apex is to overlap the ends of the poles. I
was well on the way to making a fancy hinge when common sense prevailed!
The cross lap joint may look
unsophisticated
but is strong, it works, is easier to make and stores well.
Assemble the foot hinges first, place the assembly on the deck with the deck pads tied to the stanchions, cross lap the poles
to form the A-frame, clamp
them together and
drill a pilot hole through the middle of both poles. Be very
careful in drilling the pilot holes as alignment is critical. If you are off even by a little bit, the hinge will bind.
Drill out the holes to 1/2." Then insert a 1/2" hinge bolt
with a nut as a spacer
between the poles to create room for the eye bolt nuts. The
two eye bolts (cast type are strongest) are through bolted just below
the apex hinge bolt. Finally, test your frame by swinging it
through the full 1350 arc of travel.
The forestay attaches to the aft facing eye bolt and the 4:1 block and
tackle or winch line attaches to the forward eye bolt.
At
right you see the apex of the A-frame with the
block and tackle in place.
I tow Panache
regularly with the A-frame hanging just below the mast, unless somebody
has borrowed my A-frame!
|
|
4a, PULL A-FRAME with BLOCK & TACKLE (1999) - I have pulled Panache's mast up with a 4:1 block & tackle and an A-frame for the first 23 years. This requires ~90' of 3/8" line, leaving a long tail section that allows the helper to stand
well out of the drop zone while pulling. Some people are squeamish about a stick falling on them!
PULL with PRIMARY WINCH - If you're going to crank the mast up using one of your primary winches (replacing the helper who pulls the block & tackle), then the line must be ~130' long. If you ever had a desire to install self tailing primary winches, there is no better justification than to step the mast. With a self tailing winch you can safely stop in mid lift to correct a snag. Although if you leave the winch it is safest to also secure the line around a cleat.
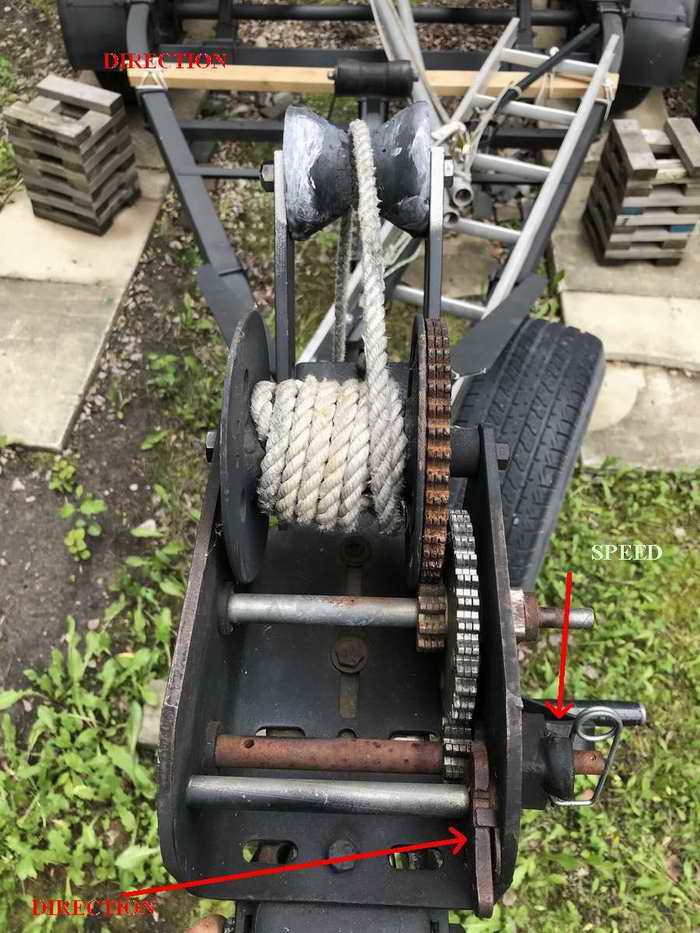
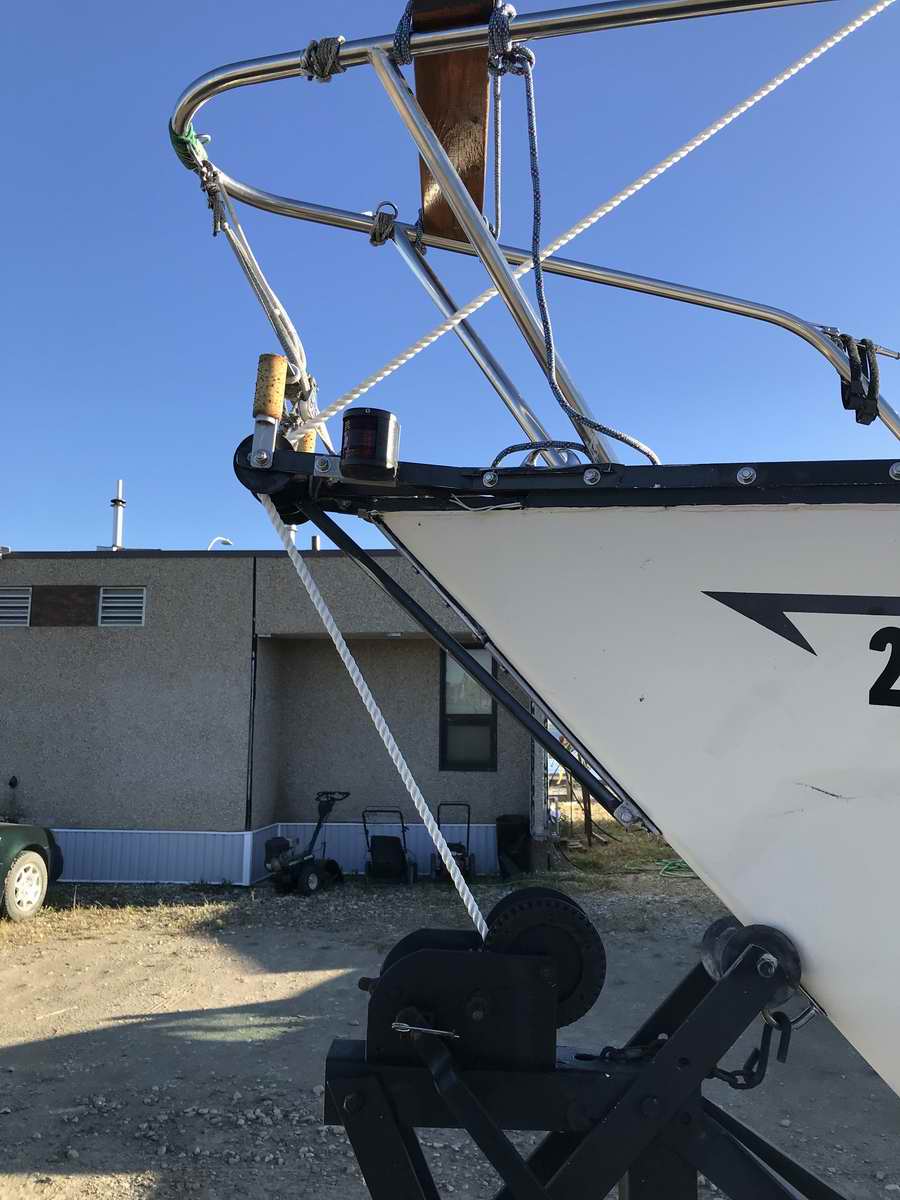
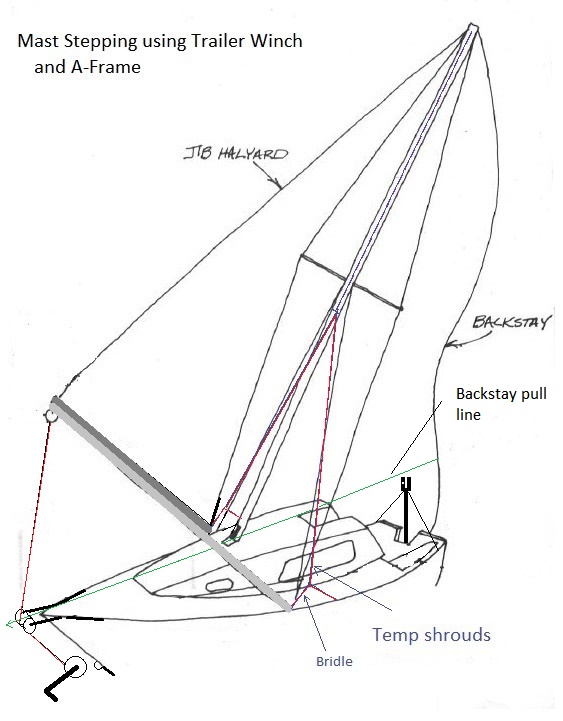 4b, PULL A-FRAME with TRAILER WINCH (2022) - At the end of 2021 I helped a friend lower his mast and discovered how easy it is to pull the A-frame using a trailer winch. He uses 2" wide woven seat belt webbing for a hoist line. The webbing packs tight on the drum and on his boat passes it over the bow without touching it. For similar operation on Panache I run the hoist line over the anchor roller to get around the bow. Since the flat portion of an anchor roller isn't wide enough for 2" webbing I use 1/2" (12mm) polyester line over the port roller. The port roller lines up more closely with the bottom eye on the port bar of the A-frame, making for an even roll on the winch drum. The 2 speed trailer winch has a ratchet that locks in either direction so it can stop in mid lift, giving me a chance to release a
potential snag.
| NOTE - An alternative to using a bow roller might be a turning block secured to the inside of the pulpit, just in front of the vertical legs. The compression strain on the pulpit would be a balance between the changing angle of the forestay and the angle to the winch. I offer this as food for thought as I have not tried it. |
So as an experiment at end of the 2022 I lowered
Panache's mast using the trailer winch. The mast went down with the greatest of ease. Of course I had to try lifting the mast from horizontal, which the winch handled easily in low range. I always found that lifting the mast from horizontal using the block & tackle to be impossible without an initial lift from somebody in the cockpit.
The new winch hoist line
is 20' of 1/2" (12mm) triple plait polyester, (~5080 lb. BS & 710 lbs SWL). The trailer eye hook is spliced on the end of the line with 6 tucks into the standing line, plus a taper. It took ~4 weeks to remove most of the construction stretch and harden the line by tensioning it really tight while exposed to rain and sun. Hard line packs tight under load on the winch drum without jamming between the turns; an absolute must for hoisting. By tensioning the line to ~500 pounds it tested the overall strength to ensure it can handle the lift. Better to discover it can hold this now than to see it fail while hoisting the mast! I don't have a strain gauge to measure how much load is on the hoist line. The winch drum is full with 20' of 1/2" line. This still leaves ~6 turns of line on the drum to start the pull during the heaviest part of the hoist, when the mast is horizontal and the A-frame is vertical. It is imperative that the A-frame pads be tied to the stanchions as the pull becomes almost horizontal with the A-frame on the deck. This is when they experience the most push aft against the stanchion. The alternative hoist line is 2" wide woven polyester seat belt webbing (~6000 lb. Breaking Strength). However, it must turn over a flat 2" wide anchor roller to load up the longitudinal fibres uniformly. Protect it from UV when the trailer parked. For now the 4:1 block & tackle will be left on the A-frame in the rare case the mast has to be stepped on water. It was never my intention to step the mast on my own as I've always had somebody to help me step the mast. But there are fewer guys around to help these days so this technique is a timely welcome addition. Given the "shortage of helpers" this is now my current technique to step Panache's mast. 4c, PULL A-FRAME with ELECTRIC WINCH - A variation of stepping the mast with a trailer winch is to use an electric off-road winch. In the installation shown here the winch is temporarily bolted to the draw bar of the trailer from where it is easy to operate. This requires a long draw bar for the line to pass the bow on its way to the apex of the A-frame. Besides the large torque of an electric motor, this style winch has internal gears to increase the pulling power.
I doubt that mast hoisting is much of a mechanical load for this winch. The electrical power comes directly from the truck battery and alternator, which is standard practice to power an off-road winch and is well within limits of the electrical system. Jack hoists his mast using an A-frame connected directly by the forestay.
The nice thing about this procedure is that you have a remote control to operate the winch. The mast can go up or down quite quickly which can be a benefit in gusty wind.
| Fig 1 - The winch bolted on the trailer tongue. 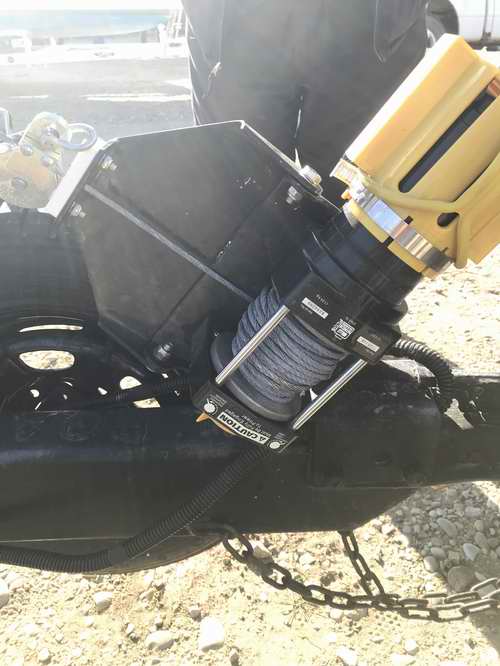
|
Fig 2 - The bracket welded on the tongue to fasten the winch. 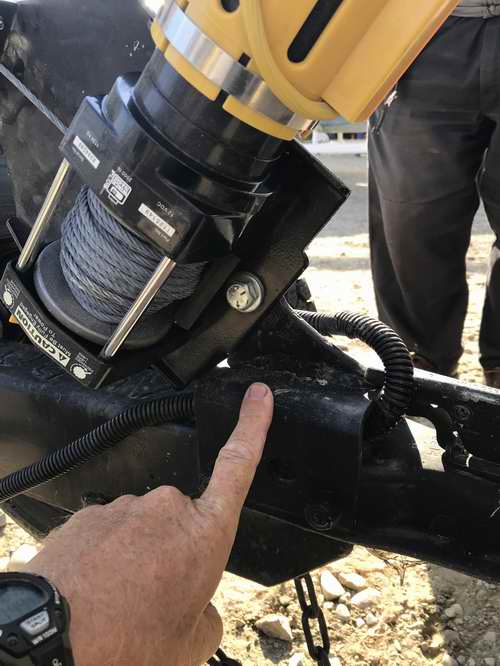
|
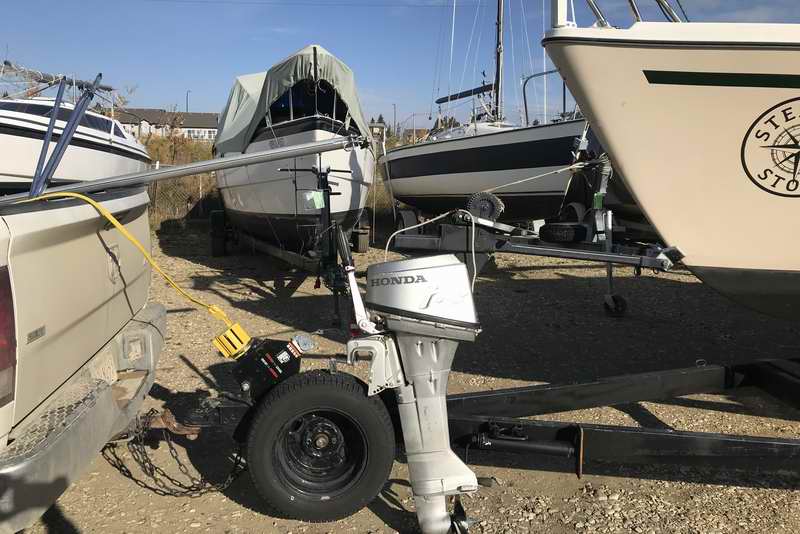
Fig 3 - The trailer tongue protrudes well forward of the bow with the winch temporarily mounted on top of it. The power cable is clipped to the truck battery under the hood for maximum juice. Notice the A-frame laying over the tailgate. Its a similar configuration to Panache's. Stepping Stone is ~25' long so this mast is heavier than an SJ23 mast. The winch has no problem hoisting the mast. The winch is transported in the back of the truck. |
I think this includes pretty well all the popular techniques of stepping the mast. If you have an alternate technique, I'd be interested to hear from you. Bob. _TOP
|
|
TEMPORARY SHROUDS to ELIMINATE SIDE SWING of
MAST (2014) - I used to man-handled the mast to control the side swing while my buddy pulled the
A-frame hoist line. I wrestled with the mast for many years but always thought there had to be a better way.
Why do I always have gusty winds when I step the mast? What follows is the result of a successful experiment during my 2014 haul out using temporary shrouds tied between the toe rails and the mast to control side swing.
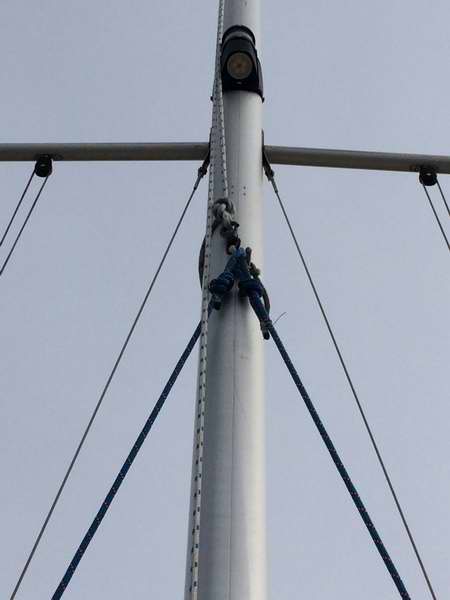 The
problem of tying temporary shrouds to the SJ23 toe rail is that the deck elevation is below the pivot point of the mast. As a result the lines go slack when the mast is lowered, rendering them useless. The key to solving this is to artificially raise the toe rail to the pivot height of the mast
foot thereby maintaining line tension for the full arc of stepping the mast.
This can be done with a bridle secured to the toe rail adjacent to the mast as shown below. The steel ring, tied at the middle
of each bridle, just aft of the stanchion, becomes the elevated pivot point.
BRIDLES -
Each temporary shroud consists of a bridle e/w 2 small carabineers and a welded ring (below left) plus a shroud with a loop tied at the top (right) to tie to a halyard. To position the ring to the pivot point, the bridle lines are unequal in length to fit the spacing of the toe rail holes. For expediency the aft line is marked. Carabineers are used to clip the bridle to the toe rail. The temporary shrouds are 11'
7" long, hoisting to about a foot (30cm) below the spreaders. The line is low stretch 5/16" polyester. To ease use, the bridle and shroud are permanently spliced to each other at the ring.
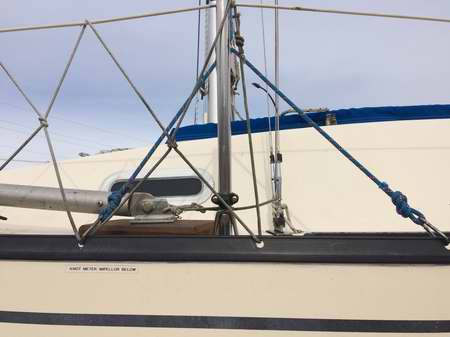
WRAP HALYARD (2014) - My first version of tying the temporary shrouds to the mast involved wrapping the halyard around the mast. This worked well because it was tight with no play. Problem is, once the halyard was choked tight around the mast it was difficult to slide it up or down and more than once I had a problem loosening the grip. I don't recommend using this technique but I'll save it for a "rainy day". I have switched to using a mast sleeve shown below in Fig 3.
|
Fig 1 - Spinnaker halyard wrapped around mast to secure temp shrouds. 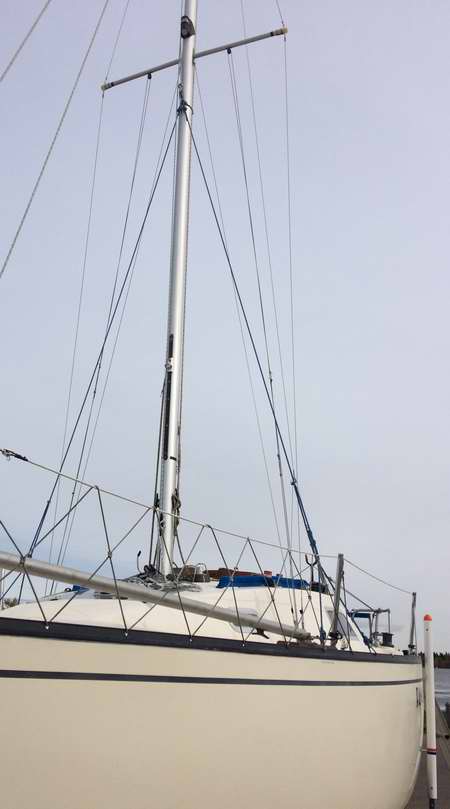
|
Fig 2 - Bridle at bottom of temporary shrouds.
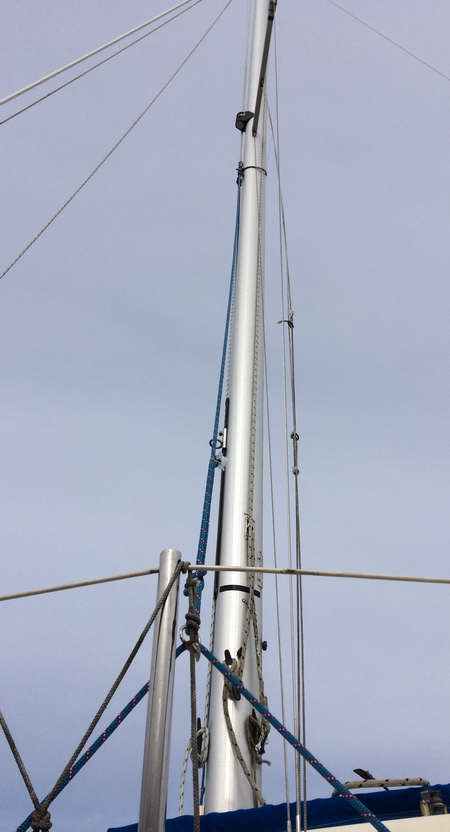
|
MAST SLEEVE (2024) - Panache's mast sleeve was repurposed from a surplus "rigging sleeve or soft shackle" that consists of a loop of Kevlar covered in nylon webbing. After cutting the sleeve to fit around the SJ23 mast I stitched and sealed the ends then pressed a SS eye through each end. A carabineer is slipped through the eyes to clip the ends together. The main halyard is clipped to the carabineer to hoist the sleeve. The temporary shrouds are tied to the front of the sleeve with a figure 8 knot. In this configuration, the temp shrouds are on the front of the mast and the main halyard is on the aft side of the mast, ensuring a tight grip (choked) on the mast with tight temporary shrouds. This sleeve slides down fairly easy which makes the job so much quicker.
MAST GOING UP
- With the mast foot pinned in the hinge and the bridles clipped to the toe rail, the sleeve is slid up along the horizontal mast till the temporary shrouds are tight with the main halyard secured to a mast cleat. Once the mast is standing, the halyard is released and the sleeve is pulled down by the temporary shrouds to be stored for the summer.
MAST GOING DOWN
- To lower the mast the sleeve is hoisted up the mast till the temporary shrouds are tight with the main halyard secured to a mast cleat. Once the mast is down I leave the sleeve and temp shrouds in place during winter storage.
- And that's the way its going to be if I can stop messing about with this procedure!
|
Fig 3 - The temporary shrouds tied to each other and the sleeve for maximum grip around the mast and minimal side play. This photo is just prior to raising.
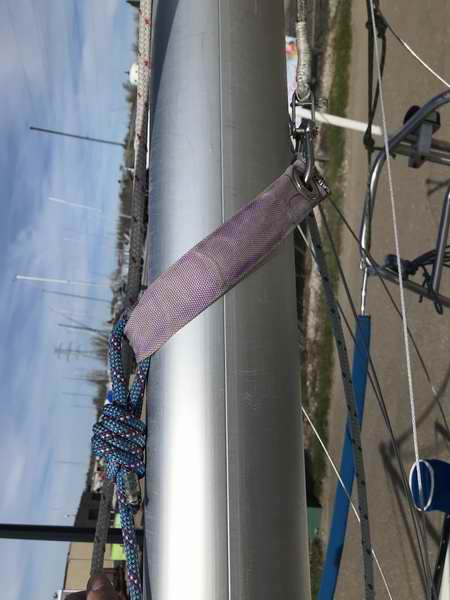
|
Fig 4 - Main halyard pulls the sleeve up the mast with the temp shrouds on the front of the mast. Temporary shrouds are now tight just prior to lowering.
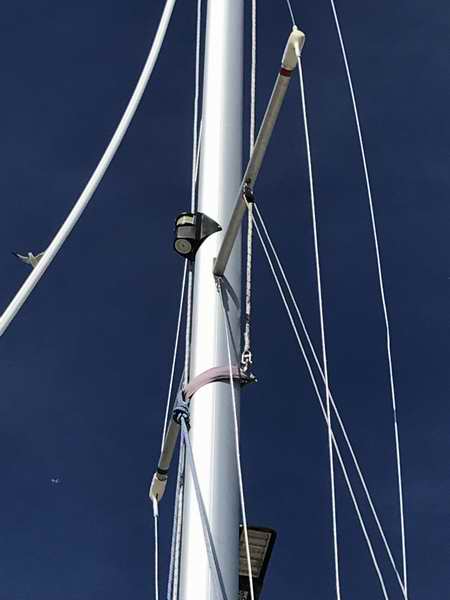
|
|
With the temporary shrouds steadying the mast you are ready to
raise or lower it using the
steps below. There is very little give in the temporary shrouds. I have
stepped the mast in a 15 knot side wind with no problem. You'll be pleasantly surprised to see how well they keep the mast centered and how easy it is to step the mast with the mechanical advantage of the trailer winch and the A-frame. Keep in mind that Panache's mast is now a tad heavier with the addition of a roller furler. Once the mast is standing, the sleeve and temporary shrouds are quite easy to pull down by releasing the main halyard and pulling the temporary shrouds. When lowering the mast the temporary shrouds consistently guide the mast into the
center of the yoke at the top of the transom mast support. No scratching or rubbing. Talk about slick. Down is a slightly lighter load on the winch but more precarious because it must settle into the yoke. Sideways movement is something I cannot control while standing at the front of the trailer. Progress.
|
Fig 5 - The mast sleeve and the temporary shrouds bundled up for summer storage.
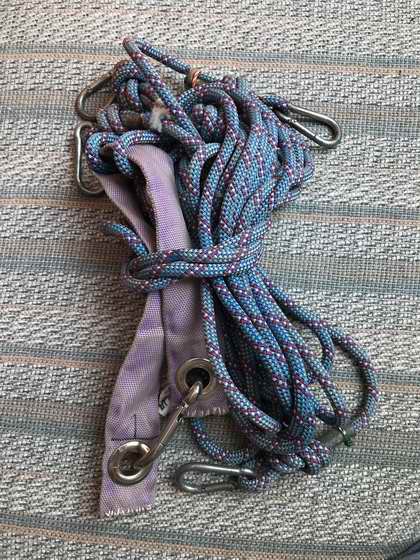
|
With the A-frame supporting the weight of the mast and the temporary shrouds controlling the side swing you have total control. As a result, I
can pull or release the A-frame hoist line from the safety of the trailer winch., The block and tackle
or a primary winch being alternate. Any of these places are preferable to standing in the drop zone of the mast. The benefits of safety and control far exceed the extra setup time. TOP
|
|
MAST RAISING PROCEDURE
(Pull A-Frame
with Trailer Winch or 4:1 Block-n-tackle) -
Before raising the mast, inspect the standing rigging where it attaches to the mast and deck.
All cotter pin ends must be rolled over leaving nothing sticking out and
show no sign of fatigue. All nuts must be screwed tight to full
depth. The wire must have no strands standing proud of a swaged or compression fitting, no broken strands sticking out ("meat hooks") or kinks between the end fittings and the turnbuckle toggles are not bent.
UPDATE - While it is easier to step the mast with this A-frame and temporary shrouds, I can now step the mast on my own pulling the A-frame with the trailer winch. However, the job is easier with two people.
OK, so lets put the stick UP.
- SAFETY - Stepping a sailboat mast is a delicate & dangerous task. Observe the steps and safety precautions listed below to reduce the possibility of injury or damage.
HIGH VOLTAGE POWER LINE - Ensure the sailboat is on the shore side of any overhead obstruction or electrical line. An aluminum must be kept at least 57ft (20M) away from a high voltage line to prevent arcing to the mast. (from the National Electrical Safety Code, NESC Handbook).
STEP MAST WITH NO VEHICLE ATTACHED (Not recommended) - When I step Panache's mast at the ramp, I
keep the trailer hitched to the tow vehicle
so it can't rock or roll away. Geez that would be embarrassing
on YouTube. However, I have stepped the mast once without the tow vehicle attached.
To say that I'm not fond of this, is the understatement of the year. However, the trailer was level on hard ground,
the wheels were blocked, and I stood on the trailer tongue to add weight forward while cranking the winch.
STEP MAST ON WATER - If you step the mast on water, it should be flat calm and use the A-frame with temporary shrouds. The boat rocks too much
when walking on the deck and
the risk of twisting the deck plate loose is too great. The only time I stepped the mast without temporary shrouds is documented in the photos below. Years later I stepped it again on flat water using temporary shrouds and all worked fine.
- TOOL APRON - I carry tools in an apron as I walk around
the boat. It saves the frustration of stumbling over loose rigging to grab an errant tool I left at the other end of the deck.
- ATTACH WINDEX & ANTENNA - Attach the Windex and VHF
antenna while you can still reach the masthead.
Do a double take on both to ensure they are aligned and tight. Its a real
pain to lower the stick again just to tighten a set screw.
NOTE - I remove the Windex for highway travel but leave the antenna in place. The RF connector is permanently sealed with butyl and electrical tape.
- PLACE A-FRAME - Place the A-frame on the foredeck with the deck pads against the forward side of each mid stanchion and wedged against the toe rail. The poles are marked starboard and port to place it on the deck correctly. Tie each deck pad around its stanchion to prevent movement.
NOTE - The A-frame lays on deck over winter. In practice the deck pads on Panache's A-frame stay wedged against the stanchions and seldom slip. But since using the trailer winch it is imperative the A-frame pads be tied to the stanchion and toe rail as the pull becomes almost horizontal with the A-frame flat on the deck. Safety is a good thing.
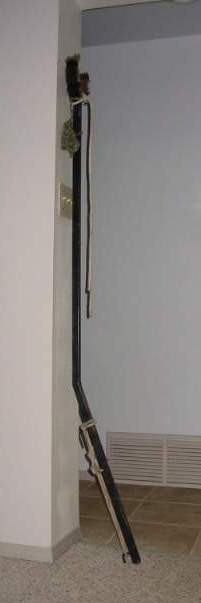 CHECK RIGGING - It is assumed the shrouds are attached to their respective mast tangs, spreaders and chain plates. The backstay is attached to the mast head and chain plate. The forestay is attached to the mast head and the turnbuckle will be connected to the stem, with the pin ready to connect to lock it.
HINT - If this is your first time
with SJ23 rigging,
read the SJ23 manual to
assemble it correctly and ensure that no rigging wires are crossed that would
prevent the mast from standing.
- ATTACH TEMPORARY SHROUDS - Clip the bridles to the toe rail with the ring adjacent to the mast and stanchion. Slip the mast sleeve over the mast, attach the main halyard and slip it close to the spreaders.
Critical tension will be set later when the mast is slid aft. See TEMP SHROUDS.
NOTE: In practice I leave the temporary shrouds in place over winter.
- LOOSEN ALL SHROUD TURNBUCKLES 3/8" - It is assumed that all shroud turnbuckles are still
loosened 3/8" from their tuned
sailing position since the previous take down. The 3/8" of slack
prevents stretching the shrouds, turnbuckles, chain plate bolts,
deck seals,
and bulkheads when the mast lifts a bit as it passes ~300 aft of vertical. It pivots on the aft end of the foot.
HINT - Set a tie wrap or line around the toggle thread at the tuned sailing position of each turnbuckle. It can reveal the
required 3/8" of exposed thread when the barrel is loosened. Ensure at
least 1/2" of thread is screwed into the barrel.
- Tape the upper & lower shroud turnbuckle toggles together in the upright position; both sides.
- Tape the backstay turnbuckle toggle in the upright
position.
Now all turnbuckles can pivot freely on their T-bolts without
the toggles binding or breaking as the mast arcs its way up or down.
- Remove the tie down lines securing the shrouds to the cabin top hand rails. These lines hold the turnbuckles up off the deck slightly to keep you from stepping on them.
- LOOSEN SPLIT BACKSTAY TURNBUCKLE -
On Panache I remove the
backstay turnbuckle barrel and release the backstay control line 8" to the knot that limits forward movement when stepping the mast. Have the turnbuckle barrel ready to install once the mast is standing.
NOTE - (Panache is E/W roller furling and the backstay must be loosened to insert or release the forestay pin).
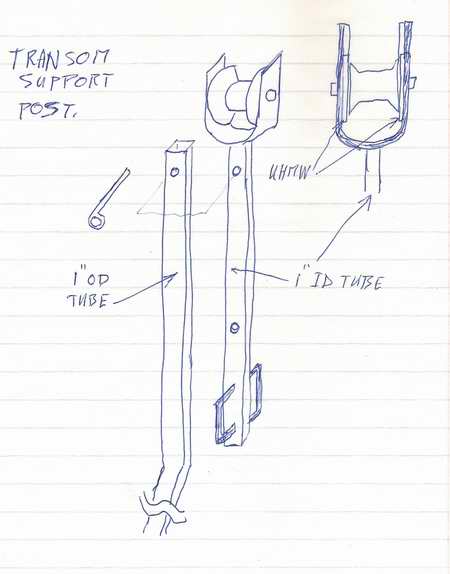
- SECURE TRANSOM SUPPORT POST - The transom support post must be tied with lateral support lines from the top of the post to the FRONT of each pushpit to steady and support it for rolling the mast aft. The post stays in the compressed position for raising the mast with the trailer winch.
HINT - If I have to raise the mast on the water using the block & tackle on the A-frame, I extend the support post with the mast
on the roller. After this I can push the mast aft on the roller.
- PUSH MAST AFT & PIN THE FOOT - Release all tie down lines along the mast, close the companionway sliding hatch (avoid stepping on it to protect the solar panels), stand on the foredeck and push the mast aft on
the roller until the mast foot
lines up with the holes in the deck hinge plate. Hold the foot of the mast down to insert the hinge pin followed by the hair pin to lock it.
SAFETY - The condition of
the fasteners that hold the foot casting to the bottom of the mast extrusion MUST be very
secure. The mast foot undergoes a tremendous amount of torque when it
is stepped. If
the fasteners are worn loose, replace them with 1/4" NF stainless
steel machine screws. Drill out the rivet holes and tap a thread
through the foot casting.
If the hole is tapped correctly, NF machine screws are stronger than pop rivets. Snug up the
screws and secure them with marine sealant to prevent movement and
corrosion. Not comfortable with machine screws? Install the biggest SS pop rivet you can find.
|
TENSION TEMPORARY SHROUDS -
Tension the shrouds with the main halyard when the mast is slid aft and pinned in the hinge plate. See TEMP SHROUDS.
HINT - If this is first time the temporary shrouds are attached, now is the time to set the lengths correctly by tightening the main halyard. (See push sleeve up).
CONNECT JIB HALYARDS TO A-FRAME - Tip the A-frame up and connect the 2 jib halyards to the apex. Then connect the hoist line to pull or release the A-frame.
A - Pull A-Frame with Trailer Winch (2022) or Electric Winch.
- Attach the winch line to the bottom eye bolt of the A-frame. Let out enough line to tilt the A-frame just past vertical where it is possible to reach the apex while standing on the deck.
- Attach the 2 jib halyards (in case one breaks) to the very top of the A-frame using 2 wraps around the pipe then clipped to itself. Divide the tension equally between the 2 halyards secured to cleats at the bottom of the mast.
- Attach the forestay to the top eye bolt so it travels with the A-frame.
- Set the winch ratchet for hoist. Use low speed for raising or lowering the mast.
IMPORTANT
- If you have roller furling you must
protect the foil when stepping the mast, especially with an aluminum foil. I leave it to your
understanding of your system to take the necessary precautions.
The advantage of Panache's flexible furler is that it can
safely flex under its own weight
while stepping the mast. So important for a trailerable boat.
- Double check the tightness of the temporary shrouds by tightening the main halyard.
- Secure all loose lines to the mast to eliminate
clutter.
SAFETY - While I have stepped the mast on my own at this point, it isn't the goal since the job is safer with a helper, especially the part when rolling down the ramp to slip the boat into the water. Somebody needs to hold on to those two lines tied to the hull! My group of aging sailors is running out of able bodied help and anything to make the job easier allows us to continue sailing.
- GO TO STEP 13.
B - Pull A-Frame using 4:1 Block & Tackle & Primary Winch.
- (Assume the block & tackle is still attached to the bottom eye bolt of the A-Frame).
- Tilt the A-frame back till you can reach the apex. Attach the 2 jib halyards (in case one breaks) to the top of each arm with 2 wraps around the pipe then clipped to itself. The wall thickness of Panache's A-frame is thick enough to handle this load.
-
Attach the forestay to the top eye bolt.
Tilt the A-frame up ~200 from the deck and attach the block & tackle to the
forestay fitting. (I have NEVER attached to the ram's horns for fear it may slip off or the horns bend back).
- Snug up the block & tackle, winding the free end around a primary winch & secure it to a cleat.
(A self tailing winch is the safest type for this job.)
- Secure the 2 halyards at the bottom of the mast, dividing the tension equally.
-
Tie all loose mast lines to the butt of the mast to eliminate
clutter.
- GO TO STEP 12.
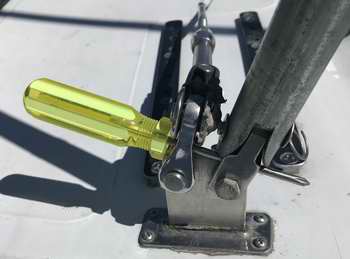 LAST INSPECTION & PULL A-FRAME -
Take a last look around the deck to ensure all rigging wire is free from a potential snag and
all turnbuckle toggles are free to pivot fore and aft. Breaking one can really spoil your day!
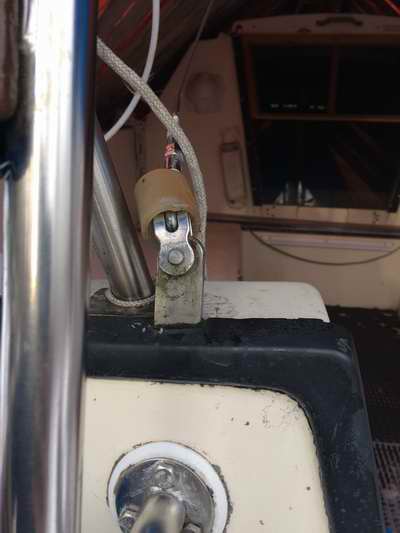
HINT - If the adjacent turnbuckle toggles (bottom flexible portion) are taped, tie wrapped or tied together in the upright position it keeps
them inline to prevent buckling while stepping the mast. In lieu of these, shove a screw driver through adjacent toggles. (Photo is not an SJ23).
- Similarly prop up (Panache) the backstay toggle with vinyl tube or tape it in the upright position.
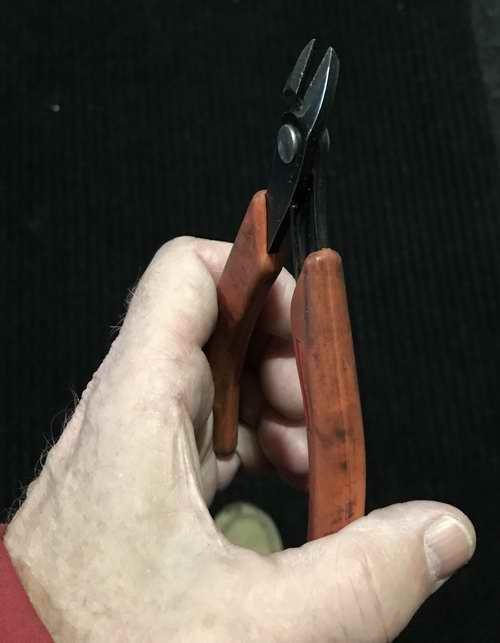
SAFETY - If you zip tie the toggles together, cut off the tail with micro shears to leave a smooth finish that is safe to pass bare skin over. If you poke your hand into a tie wrap that was trimmed with side cutters you will puncture your skin which is extremely painful. If the tie wrap has any dirt on it, the wound will likely get infected which can be lethal. A micro shear can be bought from an electronics supplier and sometimes a tool shop.
A - Pull A-Frame using trailer winch - I stand on the trailer tongue to crank the trailer winch keeping an eye over the deck for a snag. If a helper cranks the winch I stand on the deck next to the mast looking for a snag as the mast goes up.
- I have hoisted and lowered the mast several times on my own by using the trailer winch and temporary shrouds.
B - Pull A-frame using 4:1 block and tackle - My helper pulls the A-frame hoist line and I check for
snags
while standing on deck next to the mast.
- I have never been able to hoist the mast on my own by pulling the block & tackle by hand. If I ever get self tailing primary winches for Panache I plan to stand to one side in the cockpit to pull the A-frame hoist line. This is a good place to watch for jammed turnbuckles, snagged lines, etc.
If I feel resistance with either technique, I STOP to investigate the problem. You
can do serious damage to a toggle by bending it or to the wire by
kinking it. Pull the mast up to standing quickly. Don't dilly
dally with the mast half way up.
CAUTION - Using a trailer or primary winch to pull an A-frame presents both safety and a danger unto itself. If you let go of the handle the weight of the falling mast can spin the winch handle at a speed that is extremely dangerous.
"NEVER LET GO OF THE WINCH HANDLE". A - If I have to stop hoisting and leave the trailer winch, ensure the ratchet is set and the handle is secured with a line to the trailer frame by slipping the loop over the handle.
B
- If I have to stop hoisting and leave the primary winch, the free end of the line is secured around a cleat. DO NOT STAND IN THE DROP ZONE OF THE MAST.
|
- PIN THE FORESTAY & SECURE BACKSTAY - Once the mast is standing;
A - Pull A-Frame using trailer winch - With the hoist line tight (and a line slipped over the winch handle to secure it), I can safely walk
forward over the deck, hold the A-frame down with my body weight (this pulls the
mast forward against the backstay) and transfer the
forestay (no tension on it) from the A-frame to the stem fitting.
Line up the
holes, push in the forestay pin and install the locking ring. On Panache the backstay must be slackened 6" to offset the weight of the furler.
Once the forestay is pinned I tighten the back stay tensioner line and screw in the turnbuckle barrel to tension the backstay.
B - Pull A-frame using 4:1 block & tackle - Have your helper push and hold the mast forward while you transfer the forestay from the A-frame to the stem fitting. Alternatively pull and hold the mast forward with a line around it and the free end secured to the deck. Your choice.
- TIGHTEN THE UPPER & LOWER SHROUD TURNBUCKLES - With
the mast reasonably centered (left / right), snug up each top shroud turnbuckle by turning the
barrel while holding the wire from turning. Turn each barrel to the tie wrap, no further. You can use a free
hanging mainsheet halyard to confirm if the mast is centered. Snug up the lower shroud turnbuckles. Tension the rigging for sailing and
lock the turnbuckles. For fine tuning see
Tech Tip F33. The mast should be raked aft with the mainsail halyard touching the deck ~(6-8)" aft of the tabernacle.
- REMOVE A-FRAME & TEMPORARY SHROUDS -
Now that all the turnbuckles are snug it is safe to remove the
halyards from the A-frame and place it on the trailer. The transom
support post goes in the truck and the temporary shrouds go in a bag for the mast take down in the Fall.
- INSTALL RUNNING RIGGING - Run all halyards and reef
lines to their respective rope clutches at the cockpit. A really easy way to
"push" a line through a rope clutch is to use a fine fid.
Stop using a little screw driver.
- INSTALL BOOM - Install the boom on the mast.
- Connect the boom topping lift and main sheet.
- Connect the boom
vang.
- Run the lazy jacks run through their respective block under each spreader.
- Install the mainsail and run it up the mast.
- Run the reefing lines.
- Lower the mainsail for storage on the boom.
- Lay the cover over the mainsail.
INSTALL JIB - If you have a roller furling now is the time to slide the jib up the foil and store it in the rolled
position. See
Tech Tip F10.
______________________________________________
- LOWER THE MAST - Reverse the hoisting procedure
above to lower the mast. Hope you can remember all this?
There is one additional step required when lowering the mast on your own. The mast must be pushed aft to overcome the initial resistance of the mast foot that keeps it standing. After attaching all the required mast stepping lines:
A - Lower A-Frame using trailer winch
- Tie a 30' long line to the backstay (green in the sketch above) and send the free end forward over the deck to the trailer winch. Start tilting the mast aft by simultaneously pulling the long line and releasing the winch line, slowly. Keep pulling until gravity takes over and the line tension increases (~200 aft) as the mast is lowered on the hoist line. Continue lowering the mast till it nestles in the crutch on the transom post. I successfully started lowering the mast on my own in 2023.
B - Lower A-frame using 4:1 block & tackle - Push the mast aft while letting the A-frame lift line (block and tackle) out with your hand until gravity takes over and the line tension increases (~200 aft). Once gravity takes over, continue lowering the mast by letting the hoist line out till it nestles in the crutch on the transom post.
If
you have never stepped a mast before, review and remember this procedure so you know it cold when you do the job. No guess work allowed. Go through the motion, doing
several dry runs if you have to. Nobody will pass judgment on such
an important job as this. Everybody appreciates a job well
executed and done safely. Practice, practice, practice till
everybody understands. The
astronauts do it all the time. If I have a "green
horn" to help me, I always go through at least two dry runs with them till I know they understand.
You know they understand when that squirrelly look on their face changes
to a "light bulb" smile. If you don't get that light
bulb moment, change your description
of the process! Go slowly so no steps are missed. "I once helped a guy lower his mast and quickly discovered he knew very little about the procedure when it got stuck above horizontal, just out of reach from standing on the dock. His lines were too short (tightened to violin tension) preventing the mast from being
fully lowered. While he yelled for my help it was scary how quickly he was willing to
cut a
crucial line in the urgency of the moment to prevent a deck fitting from
being ripped out. Had he done so, the
mast would have dropped and likely bent. As it was, some kind
hearted dock watchers supported
the mast so we could release the lines and then we all lowered the
mast gently to the deck. After discussing the problem, he still didn't
realize the physics of a mast base that pivots on the cabin roof, well
above the deck where the A-frame pivots. Sometimes the
obvious isn't obvious to all! But it does demonstrate the need to
fully understand the physics of the task."
TOP
|
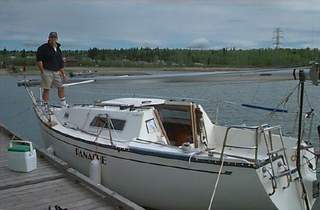
NOTE - Words are all fine and dandy but photos demonstrate the procedure better. These were taken in 1999 the first time I used the A-frame; years before Panache had roller furling, the transom support post was a fixed length and I removed the solar panel from the deck. This was the only time I stepped the mast on water without the temporary shrouds that eliminate sideways movement of the mast. Never again!
|
|
Fig 1 -
This was my first time using the new A-frame and my buddy Ron was curious about my latest gadget so he came along to help. The road
tie down lines were released, deck cleared of gear and Windex
and VHF antenna attached.
|
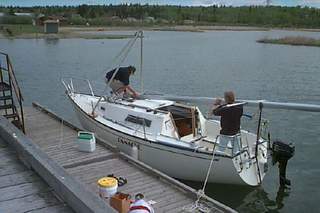
Fig 2 -
Mast was carried aft and the foot aligned to the tabernacle. Here I'm
rotating the mast into alignment so Ron can insert the hinge pin to
full depth.
Note that the mast is still supported by the
transom support post.
|
|
Fig 3 -
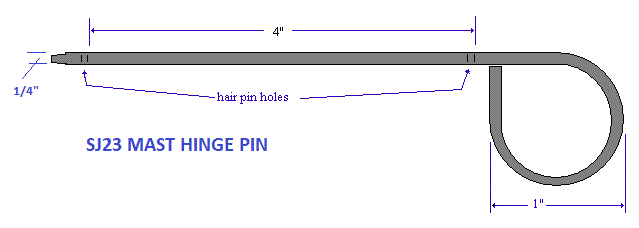
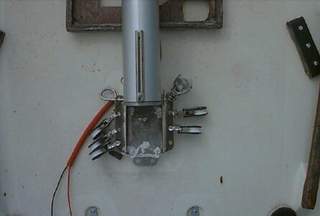
Hinge pin is inserted. I made this custom hinge pin because
it was difficult and time consuming to insert the factory pin through the tabernacle and mast base.
The end of the pin is slightly tapered to facilitate easier insertion. The finger loop on
the end makes it real easy to manipulate.
- Base plate is Rig-Rite part K-1374.
 |
Fig
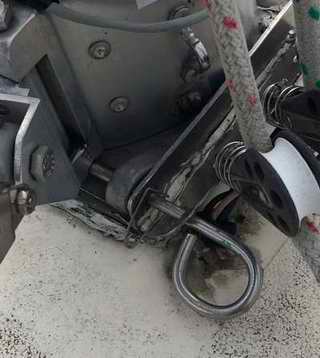
3a - Hinge pin is made from
1/4" stainless steel rod. I bent one end back on itself to
create a loop for easy handling. There is a hole drilled
through the pin to lock it with a SS safety pin.
|
|
Fig 4 -
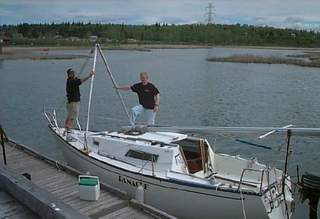
Final check of A-frame, forestay is attached to the apex of the A-frame,
block & tackle hoist line is attached between the apex and the bow.
|
Fig 5 -
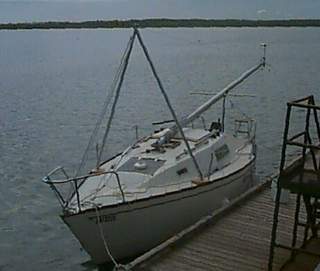
Turnbuckles
loosened
and standing up.
Halyards are attached to the A-frame
to back up the fore stay. Lines clear. Mast is ready to go up.
|
|
Fig 6 -
Steady the mast sideways during the bottom portion of the
lift to protect the mast step and foot when the boat is floating or during a side
wind. Its a bit wiggly on a floating boat.
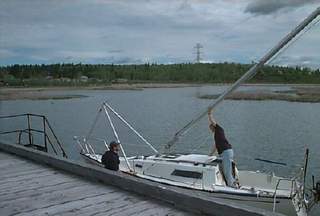
|
Fig 7 -
Mast is vertical with the A-frame pulled down to the deck. It is important to hold the mast fully forward
while attaching each jib halyard to the bow after which you can safely transfer
the forestay to the bow fitting.
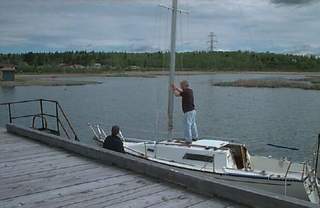
|
* RON - Ron started his slide into dementia many years ago. Today he is but a mere shell of the person he was. For all the boating projects that he helped me with, he can't recall any of them nor the many Scout camps we attended; including me for that matter. I miss him a lot. Sadly we now live a long distance apart so visiting is almost impossible.
|
|
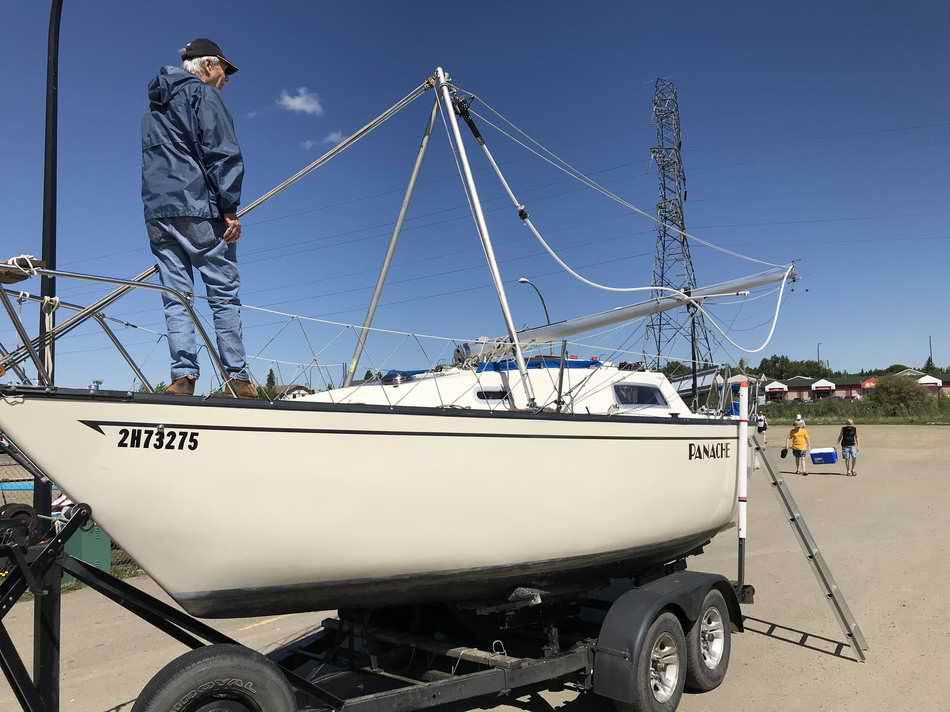
With
the addition of my Scheafer flexible roller furling I no longer use just the forestay to step the mast. Instead,
I use
both jib halyards (two wraps around an A-frame arm, then clipped to
itself with the forestay attached to the apex of the A-frame.
I
also use temporary shrouds to eliminate side swing of the mast. Once the
A-frame is down on the deck (mast is standing) and the hoisting line
is secured, I walk to the bow to transfer the forestay to
the stem fitting. Next I snug up the shroud and backstay turnbuckles. In
the photo below Roy and I stepped the mast in a 15 knot side wind, with no side movement of the mast. The controls we added totally
protect the mast, the hinge plate and the mast foot. This was the last time I used the block and tackle to step the mast as I now step the mast with the trailer winch.
TOP
* ROY - 2021 was the last year my buddy Roy helped me launch Panache. Roy was instrumental in designing many projects on Panache, some of which he used later on his boat. Sadly Roy passed on in May, 2022. A close friend who I miss lots.
* Sometimes a person walks into your life and you don't realize how much they contributed until they are gone. Roy and Ron were two such people for me. In addition to personal stuff, both of them helped to develop various systems on Panache, especially the A-frame. For this I am very grateful but their loss has me assessing friendships and life. Neither of them was content with a design until it reached its natural perfection. Their drive helped me to further perfect Panache's launch system. Thankfully the A-frame, temporary shrouds, trailer winch and hull guides make this job
a lot easier with the help of two friends. "Sooner or later undt has to get schmart!" (A Roy quote) And that is what life is about. None of us are getting any younger and techniques are definitely easier to develop than find new friends. * TOP
|
NOTE
1 -
If you wish to leave the A-frame in place while towing, then suspend the apex
of the frame from the mast with a line. This prevents the frame from
pounding on the deck and punching a hole through the gel-coat. In
addition, you could use a tie down line to prevent the frame from bouncing
up to the mast! To date I know
of 10 A-frames that have been built using these plans. Mine has
stepped dozens of boat masts. Hmmm, I should say this qualifies for
a free grog!
VIDEO - Link to a U-Tube video showing
exactly my system on another sailboat. PS: I did not copy his design. I found this URL years later.
CONCLUSION - "Using
an A-frame along with
temporary shrouds and a strong winch takes all the worry
and frustration out of stepping the mast. There is no sideways movement. I have no worries about stopping mid lift to check on things. I wouldn't dare stop in the middle of a lift using the hand over hand method. The deck pads stay in place (tied with a short line) and the A-frame hinges work perfect.
I've
used this A-frame to step the mast of several other SJ23s and an SJ7.7M.
Despite the ease that I describe of stepping the mast, I still recommend it to be a two
man job because shit happens when you least expect it. That is when you need another set of hands. If it is too
windy, go find a coffee shop with your friend!"
|
|
REPLACE SJ23 MAST - If you
have "an oopsy moment" with your mast or want replacement parts, contact:
SAN JUAN SAILBOATS
Stephen Jensen
1(206) 714-9661 (4:30-7:30 PM Pacific, please)
Lots of parts and Stephen can get just about anything else that isn't in stock. Rig-Rite, Inc
1(401) 739-1140
(Sell parts for Keyon)
- The
masts for the New Bern SJ23 hulls were built by
Kenyon Marine in Guilford, CT.
- The masts for the west coast SJ23 hulls were assembled by Tom Hukle at Yacht Riggers in Seattle who
used parts shipped from Kenyon.
The masts for the SJ24, 26, 28 or 30
were made by Spar Tech. The rigging division closed shop in 2008. SPAR TECH
15230 NE, 92 St.
Redmond, Washington.
1(425) 883-2126
|